Lakehouse Editor
The Lakehouse Editor is a tool for browsing and editing data in Databricks tables. Use it to find a table, review its rows, and make in-place changes without writing SQL.
Interface layout
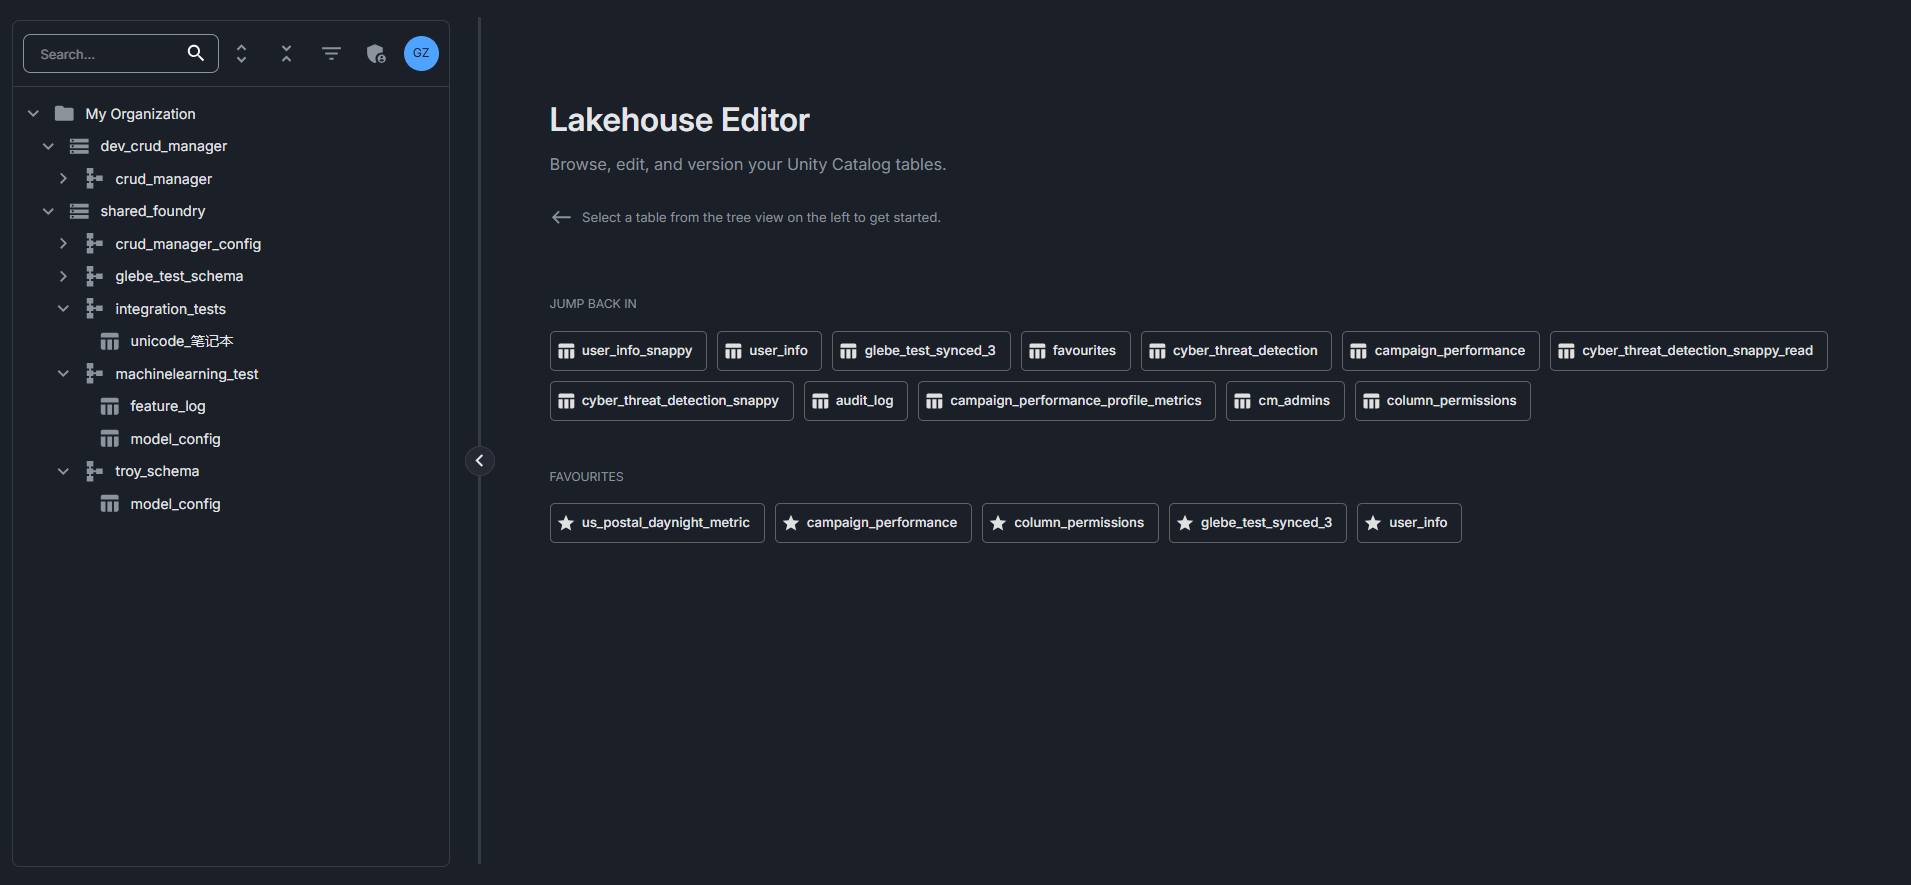
The Lakehouse Editor has three main areas:
- Left sidebar — tree of catalogs, schemas, and tables with search and filters.
- Home page — landing page showing your favourite and recently viewed tables.
- Table view — the workspace for a single table. Contains the data grid and supporting tabs.
The sidebar is collapsible. Drag the divider between the sidebar and the main area to resize it.
Browsing tables
Sidebar tree
The sidebar shows the catalogs and schemas containing tables you have explicit access to.
The toolbar above the tree provides:
- Search — filter the tree by catalog, schema, or table name.
- Expand All / Collapse All — apply to the visible tree.
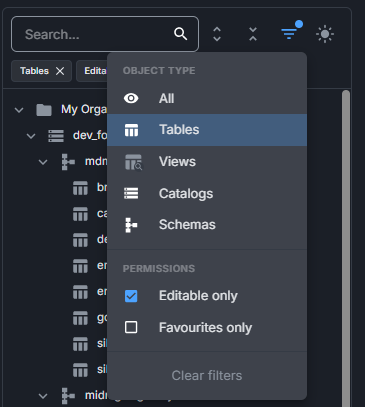
- Filter menu — narrow the tree by object type, edit permission, or favourites.
Tree filters
| Filter | Effect |
|---|---|
| Object type | Show only one of: tables, views, schemas, or catalogs. The default (All) shows everything. |
| Editable only | Show only tables you can modify. |
| Favourites only | Show only tables you've starred. |
Active filters appear as chips above the tree. Click a chip to remove it, or use Clear filters to reset.
Home page
The home page has two sections of shortcuts to tables:
| Section | Contents |
|---|---|
| Jump back in | The last 12 tables you opened, in reverse chronological order. Stored locally in your browser, so this list is per browser, not per user. |
| Favourites | Tables you've starred. Stored per user on the server, so favourites follow you across browsers. |
Use the sidebar tree to browse and discover any other accessible tables.
Table view
Open a table from the sidebar or the home page to load it in the table view. The view has tabs along the top:
| Tab | Available when |
|---|---|
| Data | Always, provided you have read access to the table. |
| History | You are an administrator and the table is not a view. Shows the Delta operation history and the rollback control. See Table history. |
| Permissions | You are an administrator and the table is modifiable. See Table permissions. |
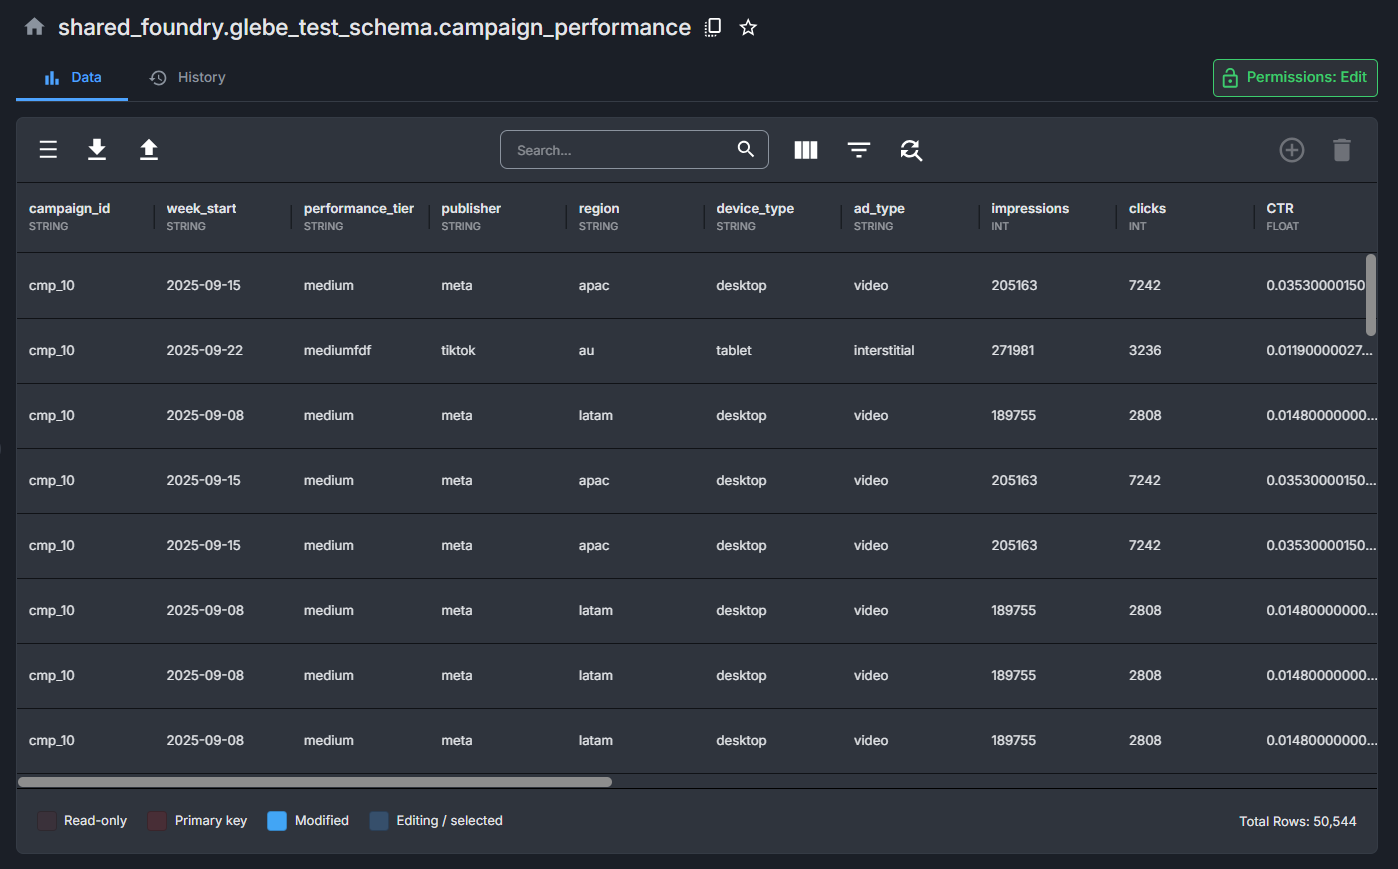
The header shows:
- The fully qualified name of the table (
catalog.schema.table). - A copy button and a star to favourite the table.
- A permissions chip summarising your effective permissions on this table —
Read,Edit,Add,Delete, or a combination of several. See Table permissions.
The footer shows:
- The total row count for the entire table.
- A Legend which shows a quick reference of the visual cues used in the data grid, including cell colours, row indicators, and badge meanings.
Data grid
The data grid is paginated server-side. By default it shows 50 rows per page and loads more as you scroll. Each column header shows the column name and data type.
Features:
- Sorting — click a column header to sort ascending, then descending, then off. One column at a time.
- Filtering — click the filter icon in the toolbar to add per-column conditions.
- Column visibility — show or hide columns from the columns menu. Hiding a column does not affect access.
- Density — switch between compact, standard, and spacious row heights.
- Selection — tick row checkboxes to act on multiple rows.
Search within a table
The search bar above the grid searches every viewable column for the entered text. Search is case-insensitive and uses substring matching across all viewable columns.
Filtering
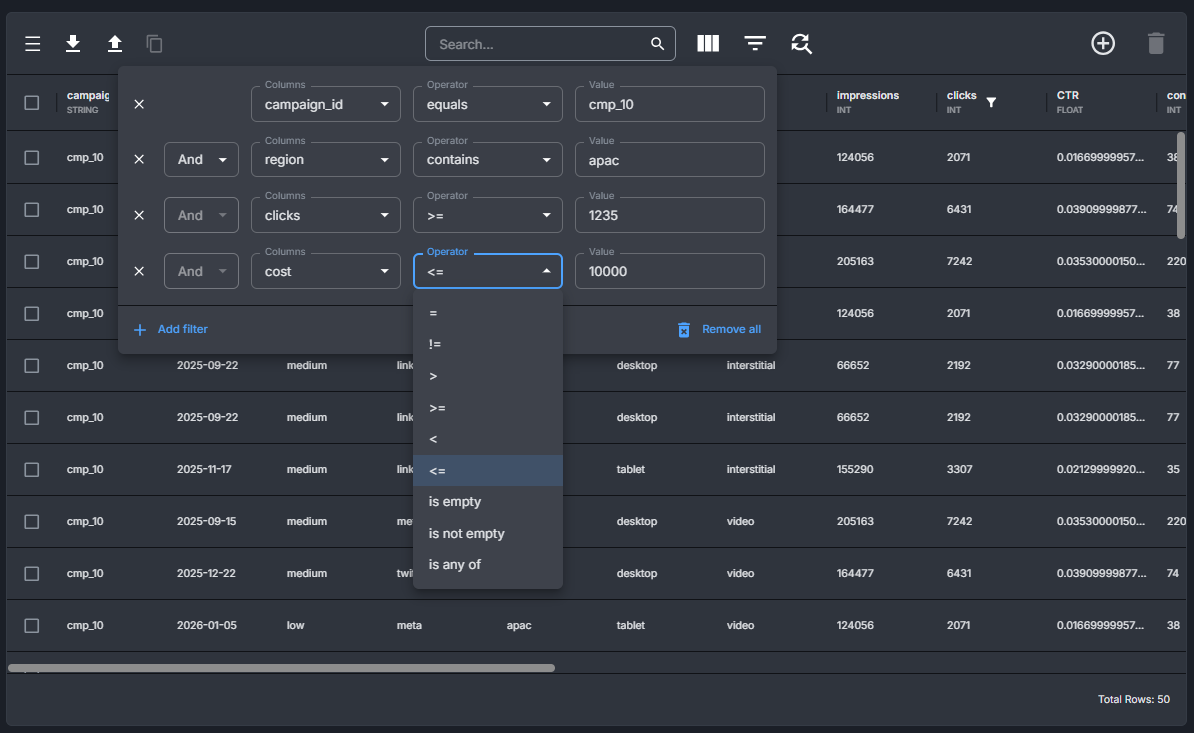
Click the filter icon in the toolbar to open the filter panel. Filtering is more precise than search — instead of looking for a substring across all columns, you build column-specific conditions that the server applies before returning rows.
Each filter rule has three parts:
- Column — pick any visible column.
- Operator — the comparison to apply. The available operators depend on the column's data type, which the Lakehouse Editor detects automatically.
- Value — what to compare against. For some operators (
is empty,is not empty) no value is needed.
String columns
| Operator | Matches rows where the column value... |
|---|---|
contains | Contains the given substring |
does not contain | Does not contain the given substring |
equals | Exactly equals the given value |
does not equal | Is not exactly equal to the given value |
starts with | Begins with the given prefix |
ends with | Ends with the given suffix |
is empty | Is NULL or an empty string |
is not empty | Has any non-empty value |
is any of | Equals one of the values in the supplied list |
Numeric columns
| Operator | Matches rows where the column value... |
|---|---|
= | Equals the given number |
!= | Is not equal to the given number |
> | Is greater than the given number |
>= | Is greater than or equal to the given number |
< | Is less than the given number |
<= | Is less than or equal to the given number |
is empty | Is NULL |
is not empty | Has any value |
is any of | Equals one of the values in the supplied list |
Combining rules
Add multiple rules with the + Add filter button. Use the operator selector at the top of the panel to choose how rules combine:
- AND — a row must satisfy every rule to appear.
- OR — a row must satisfy at least one rule to appear.
The combinator applies to the whole set of rules; you can't mix AND and OR within a single filter. Use the search bar in combination with filters for a quick narrow-down on top of structured rules.
Remove a single rule from its row, or clear every rule from the panel header to reset the grid.
Editing data
The Data tab is where you make changes. Edits are batched in the browser — nothing is written to Databricks until you press Save, so you can build up changes across many cells and many rows before committing them.
Cell states
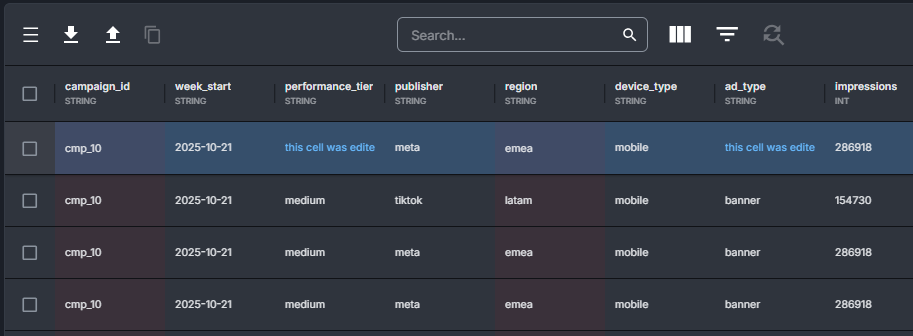
A cell's appearance tells you what you can do with it:
| Appearance | Meaning |
|---|---|
| Normal | The column is editable. Click to edit. |
| Faint red background | The column is read-only for you. You can see the value but not change it. Most commonly this means your grant on the table doesn't include this column as editable. This may also mean that the table does not have a defined primary key — in that case no one can make edits. |
| Darker red background | The cell belongs to a primary key column. Primary keys identify the row and can't be edited once it exists (they are, however, editable on new rows you add). |
| Blue text on a blue-tinted row | The value has been changed locally and is pending save. |
Edit a row
- Click a cell in an editable column. The cell becomes an input.
- Type the new value. The new value is shown in blue so you can see what you've changed.
- Repeat across as many cells and rows as you need. Modified rows are highlighted in blue so changes are easy to spot.
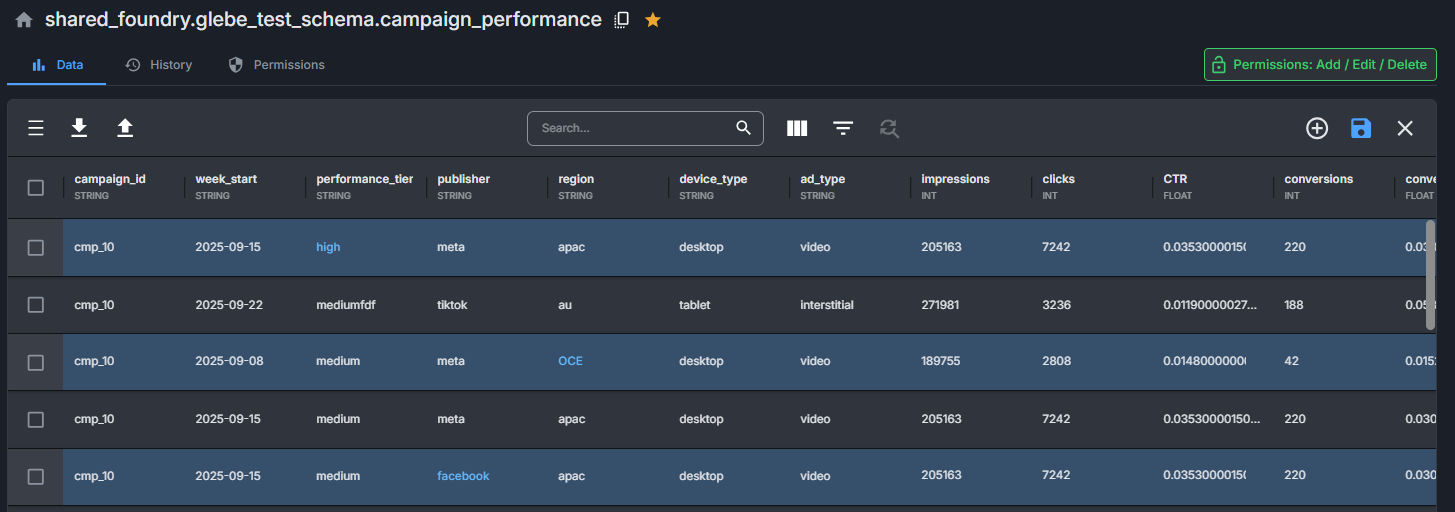
- Click the Save icon in the toolbar (or press Ctrl + S). The tooltip shows the count, for example
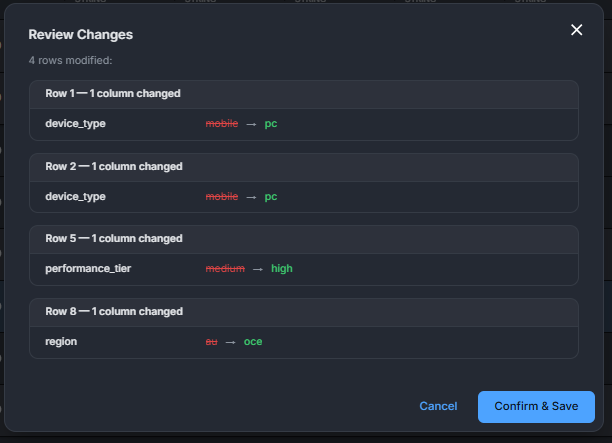
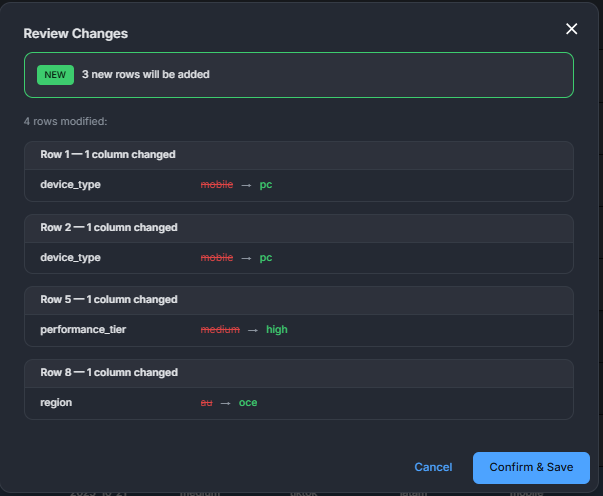
Save (3 rows changed). - The Review Changes dialog opens, showing every modification with old values in red and new values in green. Confirm to apply, or cancel to keep editing.
If you don't want to commit your edits, click the X icon (Cancel) in the toolbar to discard every pending change at once.
Show edited rows only
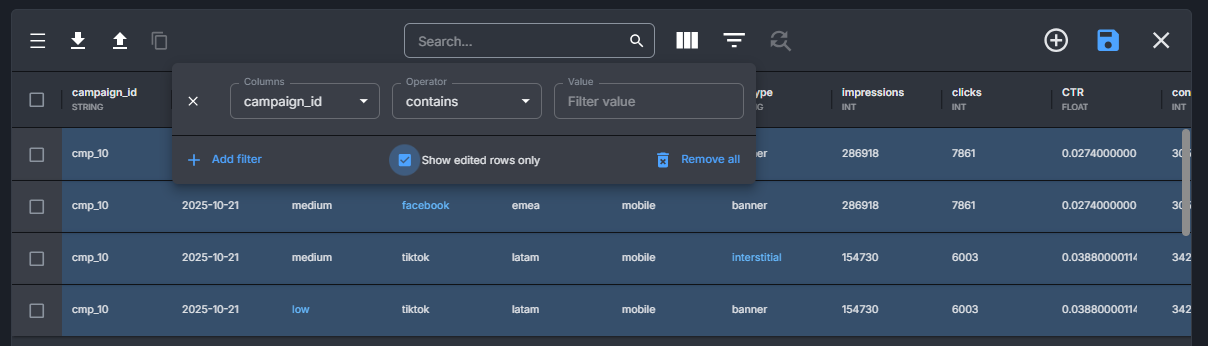
While editing, use the Show edited rows only toggle in the toolbar to filter the grid down to just the rows you've changed. This is useful when editing across multiple pages of a large table.
Add a row
- Click the + button in the toolbar. A blank row appears at the top of the grid, highlighted as a new row.
- Fill in the cells. Primary key columns are mandatory on new rows — you must supply a value for every primary key column, and the value must be unique. If the primary key you enter already exists on another row, the save will fail with a uniqueness violation.
- Fill in any other columns you want to set. Empty cells use the column's default value where one is defined, or
NULLotherwise. Non-nullable columns with no default must be filled in. - Add as many new rows as you need before saving — they're batched along with any cell edits.
- Click Save in the toolbar and confirm in the Review Changes dialog. New rows appear in the dialog under a separate New rows section, with the row count shown.
The + button is disabled if any required (non-nullable, no-default) column is one you don't have edit access to — the row would fail to save regardless. Hover the disabled button to see which columns are blocking.
If a required (non-nullable) column is left empty and has no default, the save fails with a validation error pointing to the column. Fix the value and save again. The same applies if a primary key value collides with an existing row.
Export
The Export button (download icon) sits to the left of the bulk import button. It downloads the current grid contents in your chosen format:
- CSV — plain comma-separated values. Useful for editing in a spreadsheet or feeding back in via bulk import.
- Excel —
.xlsxworkbook. - Print — opens a print-friendly view of the current page.
Export is the easiest way to produce a CSV template for bulk import. Export the table, open the file in Excel or another editor, add your new rows under the existing header, save, and import the file back in.
Bulk import from CSV
Use this to add or change many rows at once from a spreadsheet or exported file.
- Click the upload icon in the toolbar (to the right of the export button).
- Select a CSV file. The first row must be a header row containing column names that match the table's columns exactly. Headers that don't match a column are ignored.
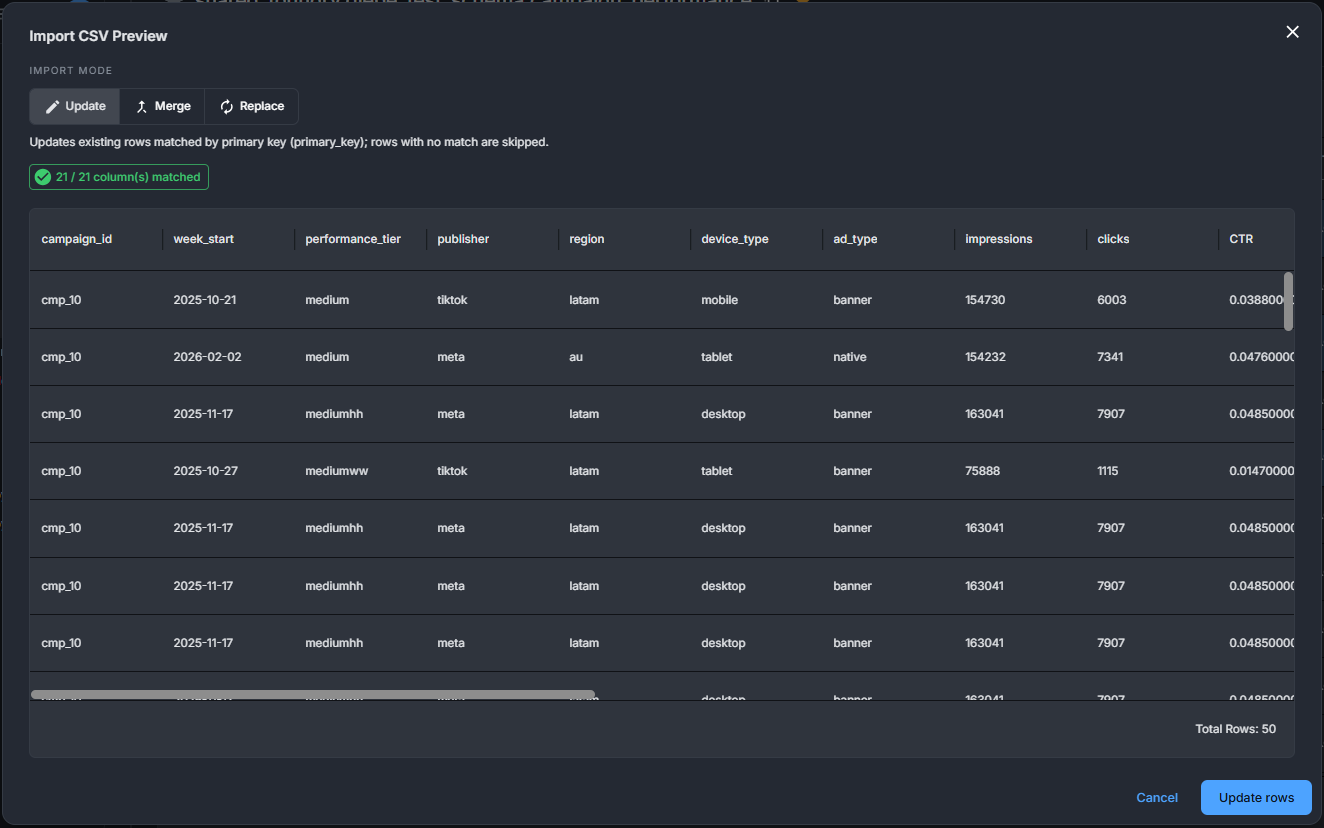
- The import dialog opens, showing a preview grid of the parsed rows and a mode selector.
- Choose an import mode (see below).
- Click Confirm to apply the import in a single operation, or Cancel to discard.
CSV requirements
These apply to every import mode:
- The first row must be a header containing column names that match the target table exactly.
- Every primary key column must be present in the CSV.
Mode-specific requirements are listed in the table below.
Import modes
| Mode | What it does | Additional requirements |
|---|---|---|
| Update | Updates existing rows that match on primary key. Rows whose key isn't already in the table are skipped. | Only the columns you want to change need to be in the CSV alongside the primary-key columns. You need edit access on the columns you're updating. |
| Merge | Upsert — rows that match an existing primary key are updated, rows that don't are inserted. | Every non-nullable column (with no default) must be in the CSV, so the inserted rows can satisfy the table's constraints. You need edit and add permissions. |
| Replace | Replaces the entire table contents with the rows in the CSV. Every existing row not in the CSV is deleted. | Every non-nullable column (with no default) must be in the CSV. You need add and delete permissions. |
Before any import runs, the dialog shows a confirmation step indicating what will change (rows updated, inserted, or deleted) so you can cancel out. The dialog also highlights any permission gaps for the chosen mode.
Replace deletes every row not present in the CSV. It is the most destructive mode — confirm you have the right file selected. The deletion is captured in the History tab if you need to roll back.
Delete rows
- Tick the checkbox at the start of each row you want to delete. Use the header checkbox to select every row on the current page.
- Click the Trash Icon (Delete Selected) in the toolbar.
- The confirmation dialog opens, listing the primary key of every row that will be deleted so you can verify the selection.
- Click Delete to confirm, or Cancel to keep the rows.
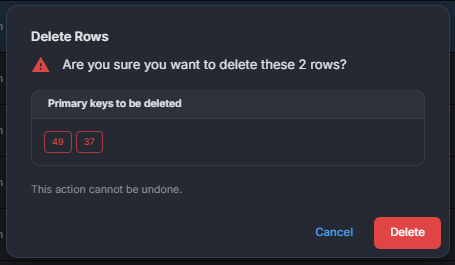
Deletion runs as a single DELETE operation and cannot be undone. Use the History tab to identify the affected version if you need to recover via Delta time travel.
Rows are matched on every column value, so concurrent changes by other users between selection and confirmation will cause the matching delete to fail rather than affect unrelated rows.
Find and replace
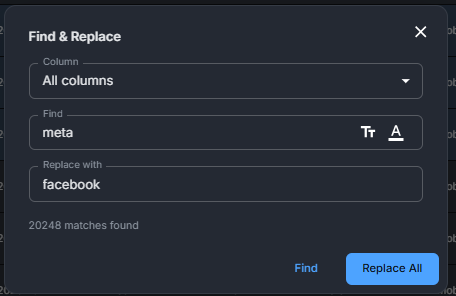
Click the Find and Replace button (magnifying glass) in the toolbar, to open the dialog. The dialog provides:
- Search Term — the value to find. Required.
- Replace Term — the value to write. Leave empty to use the dialog as a search-only preview.
- Column — apply to all editable columns or a single specific column.
- Case sensitive — when on,
Foodoes not matchfoo. - Exact match — when on, the whole cell value must equal the search term. When off, the search term is matched as a substring.
Click Find to see how many cells match. Click Replace (or Replace all) to apply the change. Find and replace only writes to columns you can edit, and skips complex types (MAP, ARRAY, STRUCT).
What you can edit
Your ability to edit a table is determined by the grant an administrator has set for you. See Table permissions for the four capabilities (read, edit, add, delete) and how column-level access narrows them.
The following always block editing regardless of any grant:
| Restriction | Behaviour |
|---|---|
| Views | Views are queries, not tables. Edit, add, delete, and import are disabled. |
| Databricks-managed columns | Identity columns, generated columns, and similar system-managed values are not editable. |
| Tables with no primary key | The Lakehouse Editor refuses every operation (read, edit, add, delete) on a table without a declared primary key. See Tables without a primary key. |
If a table appears entirely read-only and you expected to be able to edit it, check whether your grant on that table includes the Edit capability.
How permissions work
The Lakehouse Editor uses a Databricks service principal to perform every read and write. Users don't need their own Unity Catalog grants on the tables they work with — instead, the service principal does, and the Lakehouse Editor decides what each user is allowed to do through it.
This means two things:
- Setup — whoever deploys the Lakehouse Editor must grant the service principal Unity Catalog access (
SELECT,MODIFY, etc.) on every catalog, schema, and table that should be reachable from the tool. Without that, the Lakehouse Editor cannot reach the data at all. - In-app access — a signed-in user sees nothing by default. They only see tables that an administrator has explicitly granted them access to from the Permissions tab on each table.
Roles
The Lakehouse Editor recognises three roles:
| Role | How it's granted | What they can do |
|---|---|---|
| User | Default for any signed-in user. | See only the tables an administrator has granted them access to. Within each granted table, they can read, edit, add, or delete rows according to the grant. |
| Administrator | Either listed in the ADMIN_EMAILS or ADMIN_GROUPS environment variables, or added by an owner via the Admins page. | Everything a user can do, plus access the Permissions tab to grant access to other users, the History tab, and the rollback control. |
| Owner | Listed in the ADMIN_EMAILS or ADMIN_GROUPS environment variables. Cannot be added or removed from the UI. | Everything an administrator can do, plus open the Admins page to add and remove administrators. |
Only administrators and owners can manage table permissions. Everyone else sees no Permissions tab at all.
Administrators
The Admins page lets owners manage who can administer the Lakehouse Editor. Click the Admin icon in the sidebar toolbar to open it. The page is only visible to owners.
A user is an administrator if either:
- They appear in the
ADMIN_EMAILSorADMIN_GROUPSenvironment variables (these are also the owners, and can't be removed from the UI), or - They were added to the admin list through the Admins page.
The page lists every administrator currently in place:
| Column | Description |
|---|---|
| Identity | The user email or SCIM group name. |
| Source | Either Owner (set by environment variable, read-only) or Admin (added through this page, removable). |
To add an administrator, enter a user email or group name and click Add. To remove an administrator, click the delete icon on the row. Owners cannot be removed from the UI — their identities are set by environment variable.
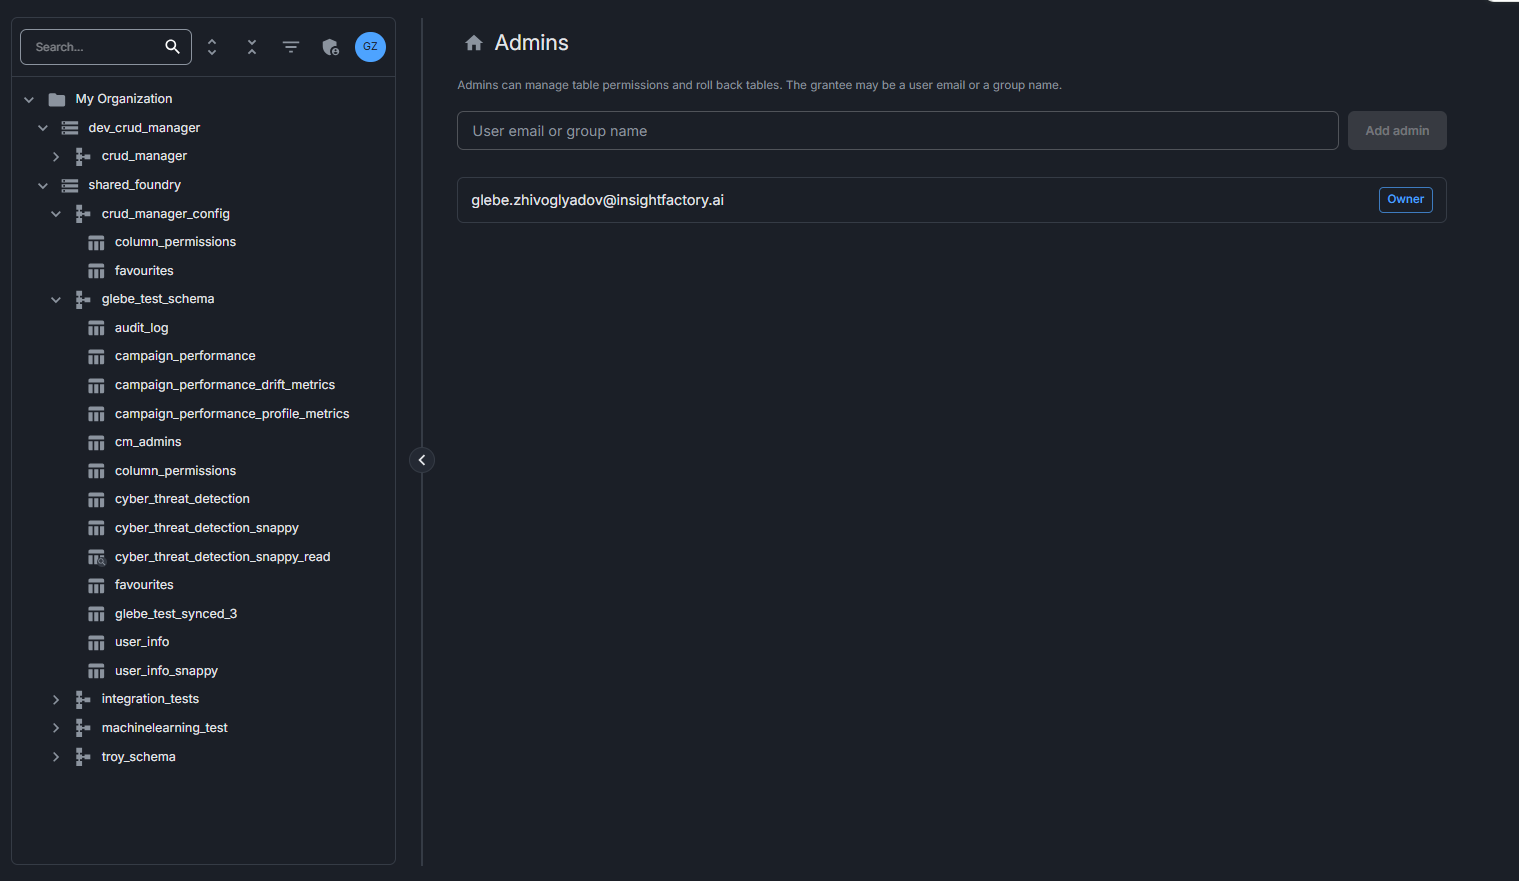
Administrators can grant themselves access on any table, see the full Delta history, and roll back tables to earlier versions. Add them carefully.
Table permissions
A permission grant gives one user (or group) access to one table. It controls both the base capabilities the grantee has — read, edit, add, delete — and, optionally, narrows the read and edit capabilities down to specific columns.
Base capabilities
Every grant defines four capabilities:
| Capability | Effect |
|---|---|
| Read | The grantee can see rows in the table. |
| Edit | The grantee can change values in existing rows. |
| Add | The grantee can insert new rows. |
| Delete | The grantee can delete rows. |
These four show up as Read, Edit, Add, Delete or a combination in the permissions chip in the table header.
The four capabilities are independent. You can grant a user Read + Edit without Add or Delete, or any other combination, depending on what they should be allowed to do.
Refining with column-level access
A grant can be more fine-grained by restricting Read and Edit to specific columns:
- Viewable columns — the set of columns the grantee can see in the grid, search, and exports. Columns outside this set are invisible to them.
- Editable columns — the set of columns the grantee can change. Always a subset of viewable.
Use this when a user should be able to see most of a table but not, say, salary or PII columns; or when they can edit some columns but only view the rest.
If you don't want column-level restrictions, grant access on all columns and the grant behaves as a straightforward Read or Edit on the whole table.
What users see without a grant
A user with no grant on a table doesn't see that table in the sidebar tree at all. If they navigate to it by URL, the grid shows a message telling them they don't have access to the table.
A user with a Read grant but no Edit grant sees the table's rows, with every cell shown on a faint red background to indicate it can't be changed.
Managing grants
If you have access to the Permissions tab, it lists every grant currently in place on the table. To add a grant:
- Enter a grantee — either a user email or a SCIM group name.
- Select the viewable columns. To grant unrestricted read access, select every column.
- Select the editable columns from within the viewable set. Leave empty if the grantee should only read.
- Toggle Add and Delete as appropriate.
- Click Add (or Save if you're editing an existing grant).
Click the delete icon on a grant row to remove it.
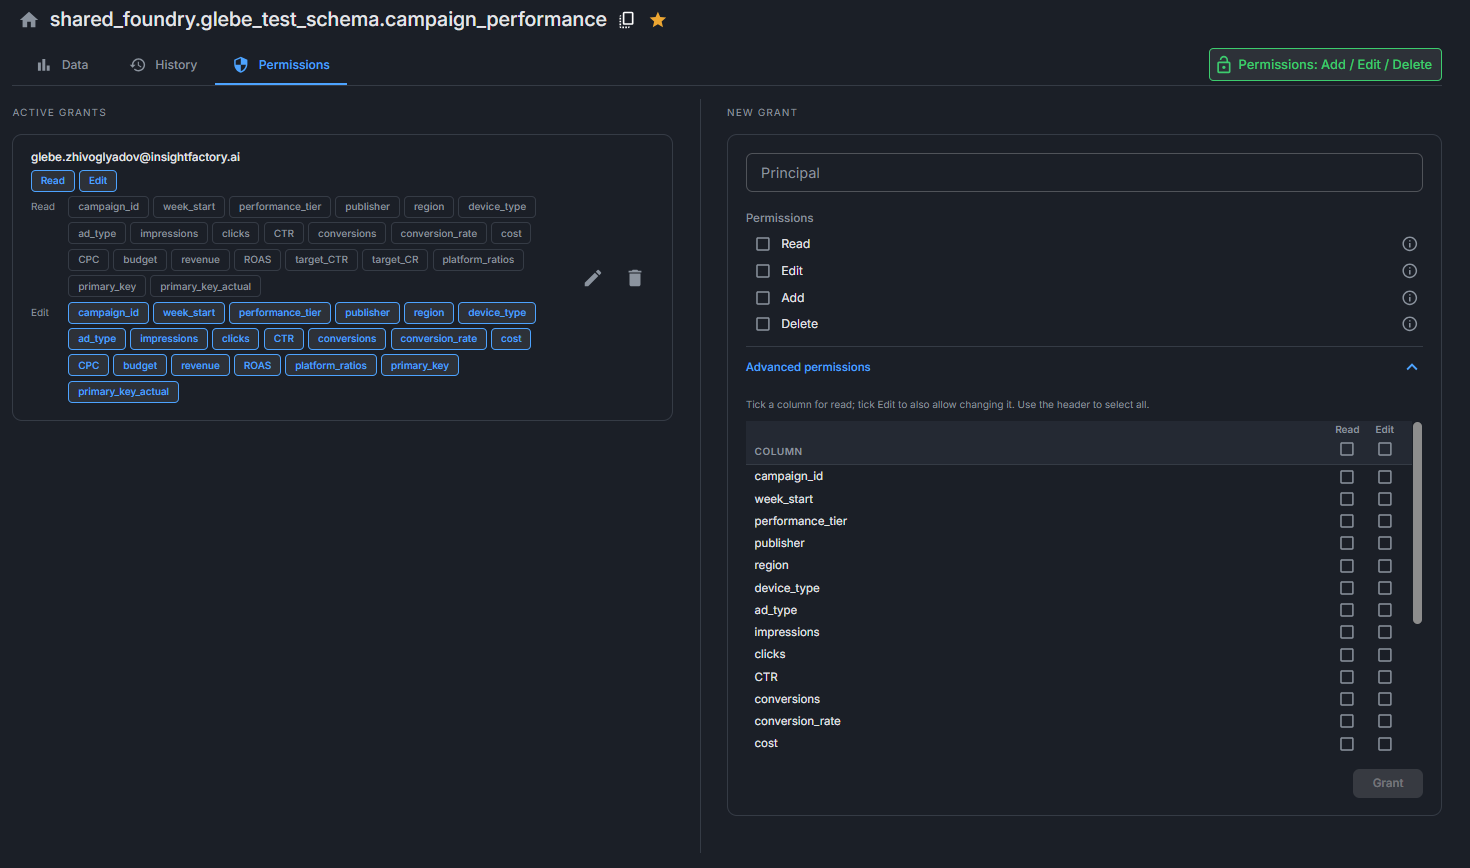
Saving a grant for an existing grantee overwrites the previous entry — there is no merge or edit-in-place. If you want to extend an existing grantee's access, include all their existing columns and flags in the new grant.
Favourites
Click the star in the table header to favourite a table. Favourites are stored per user on the server, so they follow you across browsers and devices. Favourited tables appear:
- In the Favourites section on the home page.
- As starred items in the sidebar tree.
- Filterable via Favourites only in the tree filter menu.
Table history
The History tab shows the Delta Lake operation history for the table. Each row represents one operation applied to the table, including operations made through the Lakehouse Editor, through Databricks notebooks, and through any other client. The tab is only visible to administrators.
| Column | Description |
|---|---|
| Version | The Delta table version the operation produced. |
| Timestamp | When the operation was applied. |
| User | The Databricks identity that ran the operation. |
| Operation | The Delta operation type — WRITE, UPDATE, DELETE, MERGE, CREATE TABLE, etc. |
| Operation parameters | The parameters Databricks recorded for the operation, shown as JSON. |
Use the history as an audit trail to see when a row was inserted, updated, or deleted, and by whom.
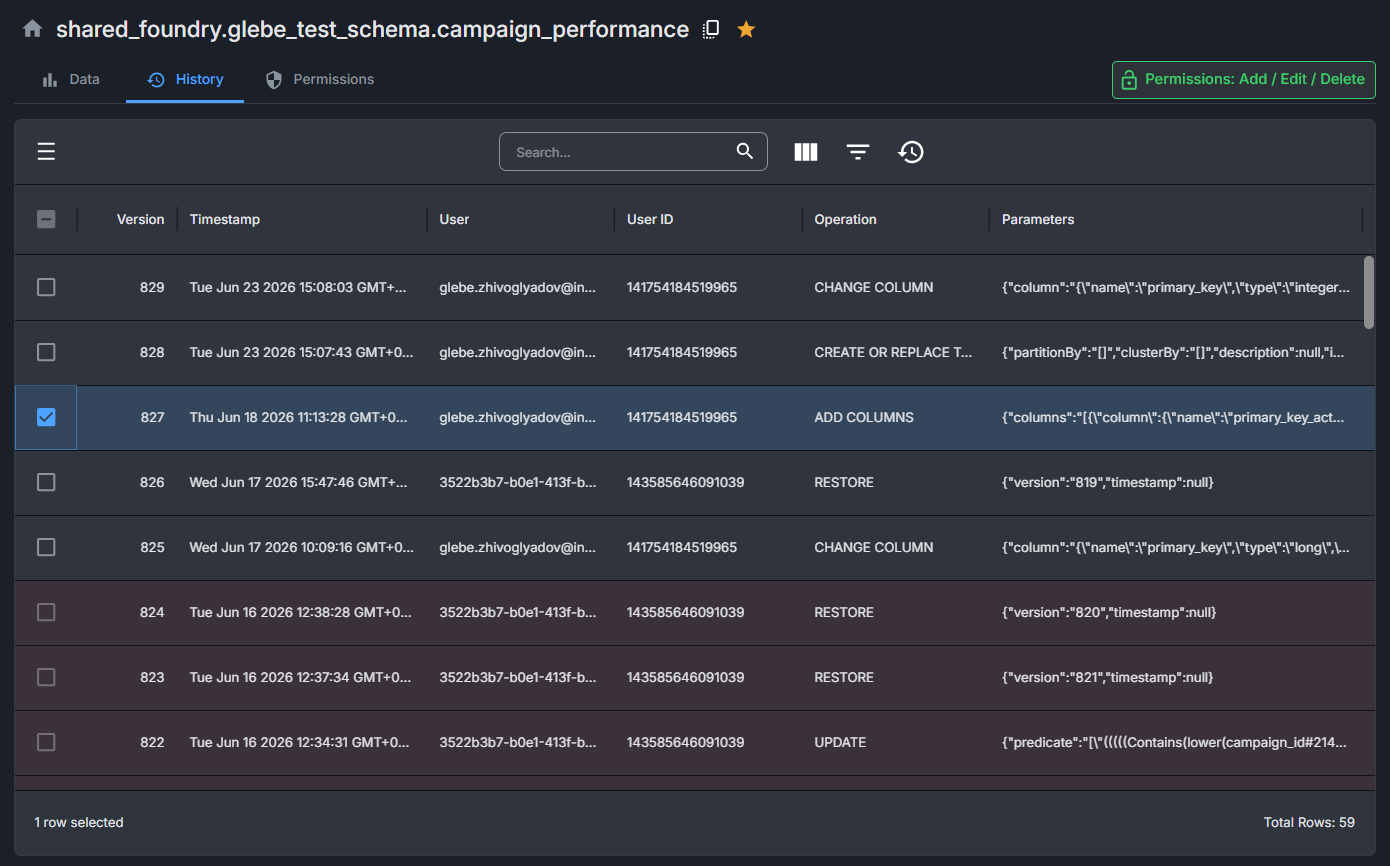
Rolling back to a previous version
Administrators can restore the table to any version within Delta's restore window (7 days by default or any other value if its explicitly configured on the underlying table).
- Select a version row in the history grid.
- Click the Restore button that appears in the toolbar.
- Confirm in the dialog.
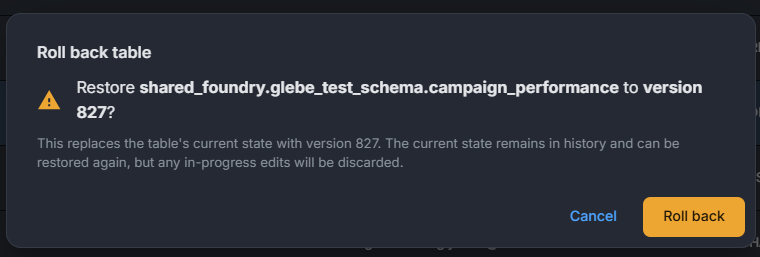
Versions outside the restore window are shown in faint red and cannot be selected. The restore itself is recorded as a new history entry, so the table can be rolled forward again.
Rollback rewrites the table contents to match the chosen version. Any rows inserted, updated, or deleted after that version are lost (though they remain visible in the history). Confirm you're restoring to the right version before clicking through.
Tables without a primary key
Every operation in the Lakehouse Editor — read, edit, add, delete — relies on a primary key to identify the row being acted on. If a table has no primary key declared in Unity Catalog, the Lakehouse Editor blocks every operation against it. The data grid shows a banner explaining why, and edit, add, and delete controls are disabled, regardless of your permissions on the table.
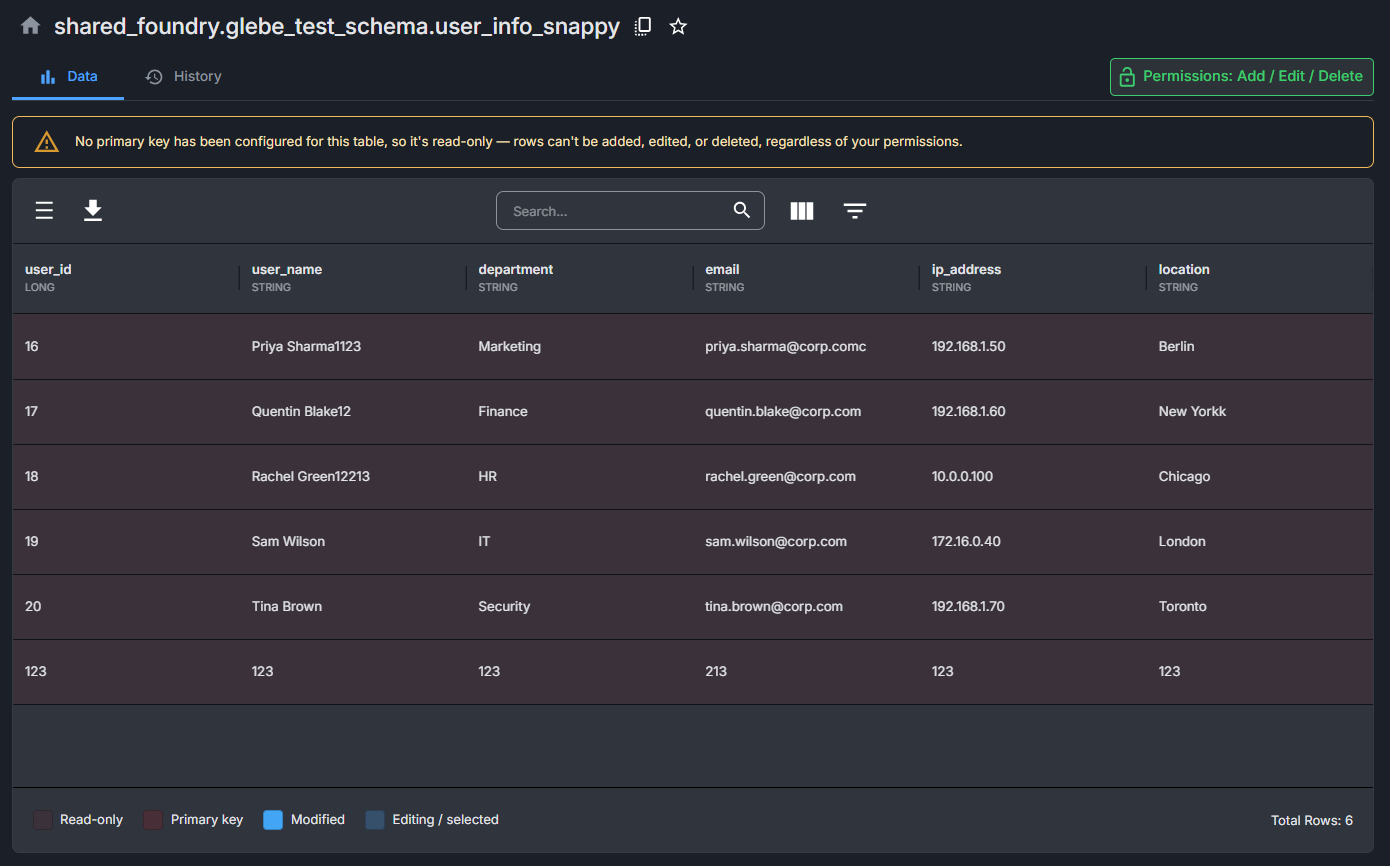
To use a table in the Lakehouse Editor, declare a primary key on it in Databricks:
ALTER TABLE catalog.schema.table
ADD CONSTRAINT pk PRIMARY KEY (id);
A composite primary key (multiple columns) is also supported.