Hierarchy Manager
The Hierarchy Manager is a tool for creating, organizing, and managing hierarchical data structures. It supports roles, permissions, business keys, node attributes, and CSV import.
Interface Layout
The Hierarchy Manager interface consists of three main sections:
- Left Sidebar — Contains the hierarchy and group list with search functionality
- Top Toolbar — Provides view toggles, actions, and utility buttons
- Main Content Area — Displays the hierarchy tree or column view
Empty Hierarchy State
This is what you will see when you create your first hierarchy. There are two options to get started.
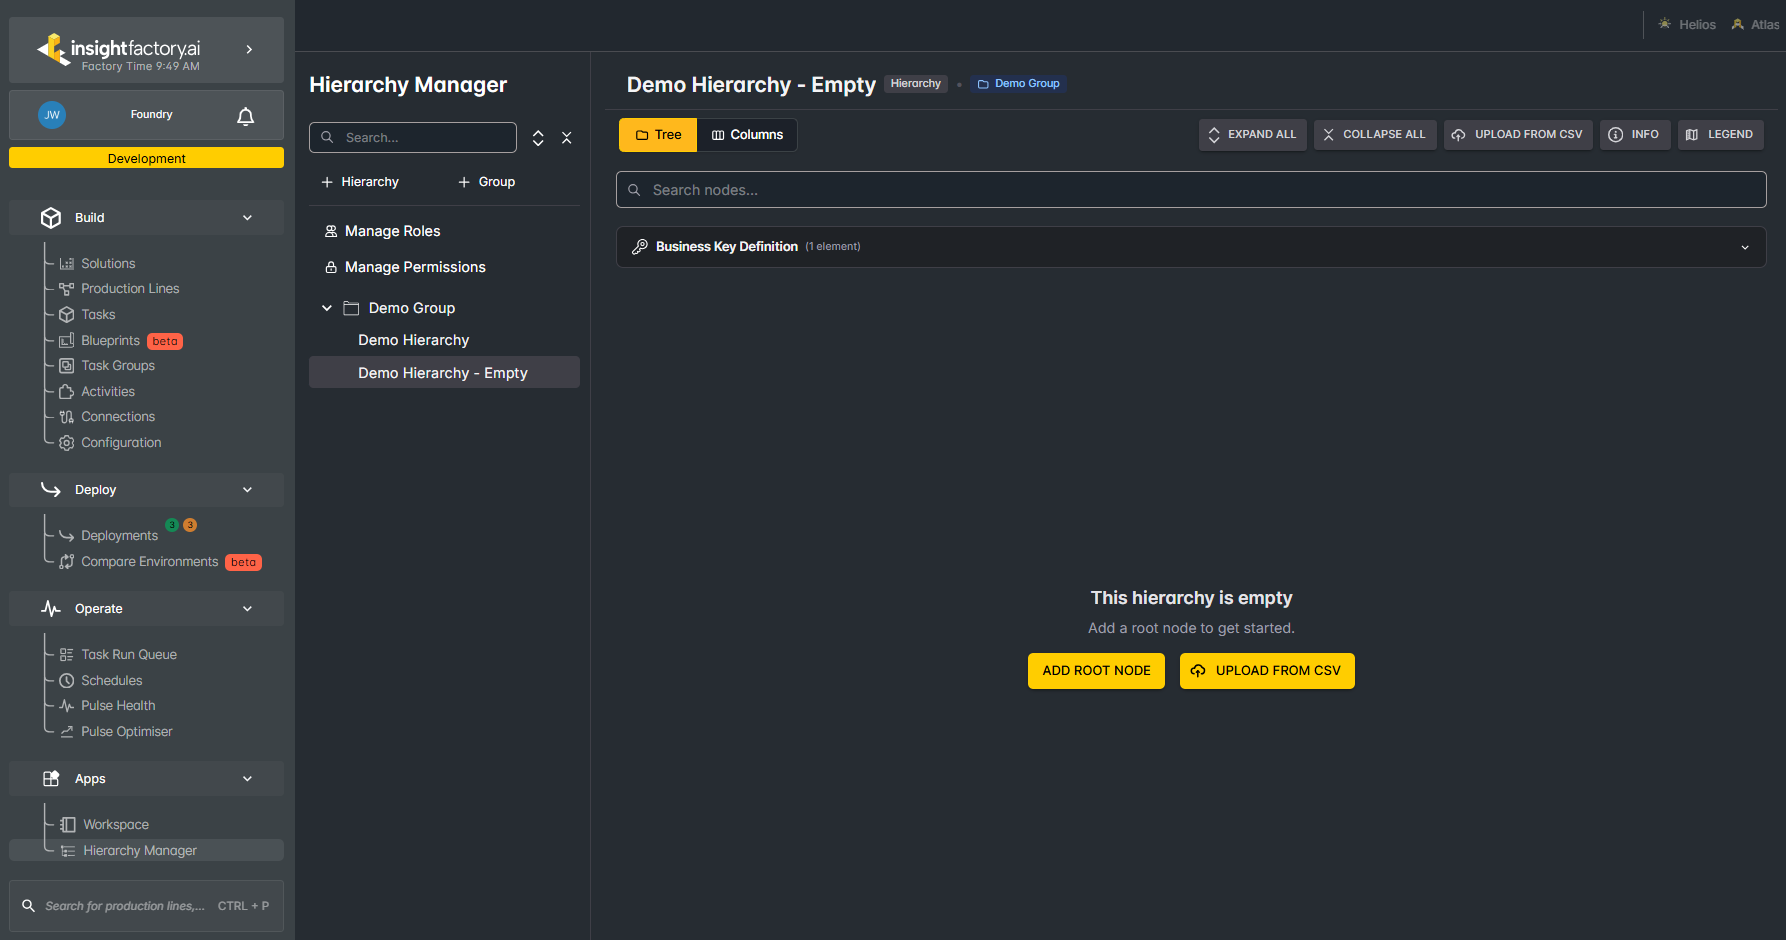
Options:
- ADD ROOT NODE — Create the first node manually. See Editing Nodes.
- UPLOAD FROM CSV — Bulk import nodes from a CSV file and automatically generate the tree structure. See CSV Format below for the structure and an example file.
CSV Format
Each column represents one level of the hierarchy, and each row represents a path to a child node. Each cell follows this format:
<node-name>{
  "display-name": "<display-name>",
  "attributes": {
    <attributes-json>
  },
  "business-keys": [
    {
      "<key>": "<value>",
      "<key>": "<value>"
    }
  ]
}
<node-name> is mandatory. The JSON object that follows is optional, as is each field within it:
| Field | Description |
|---|---|
| display-name | Optional label shown in place of the node name |
| attributes | Optional JSON object of arbitrary key/value pairs (string, number, boolean, array, or nested object) |
| business-keys | Optional array of objects, each holding one or more key/value pairs that identify the node. Each object must conform to the hierarchy's business key definition, otherwise the upload will fail. |
Download an example: hierarchy-manager-csv-demo.csv
Sidebar Navigation
Hierarchies and Groups
Hierarchies are organized into collapsible groups in the sidebar. Groups help categorize related hierarchies together.
- Ungrouped — Hierarchies not assigned to any group
- Named Groups (e.g., "Test Group Renamed", "Pouya Inc", "Platform Developers") — Custom groups containing related hierarchies
Sidebar Actions
At the top of the sidebar, you'll find:
- Search Bar — Filter hierarchies by name
- + Hierarchy — Create a new hierarchy
- + Group — Create a new group
- Manage Roles — Access the roles management page
- Manage Permissions — Access the permissions management page
Creating a New Hierarchy
Click + Hierarchy in the sidebar to open the Create New Hierarchy dialog.
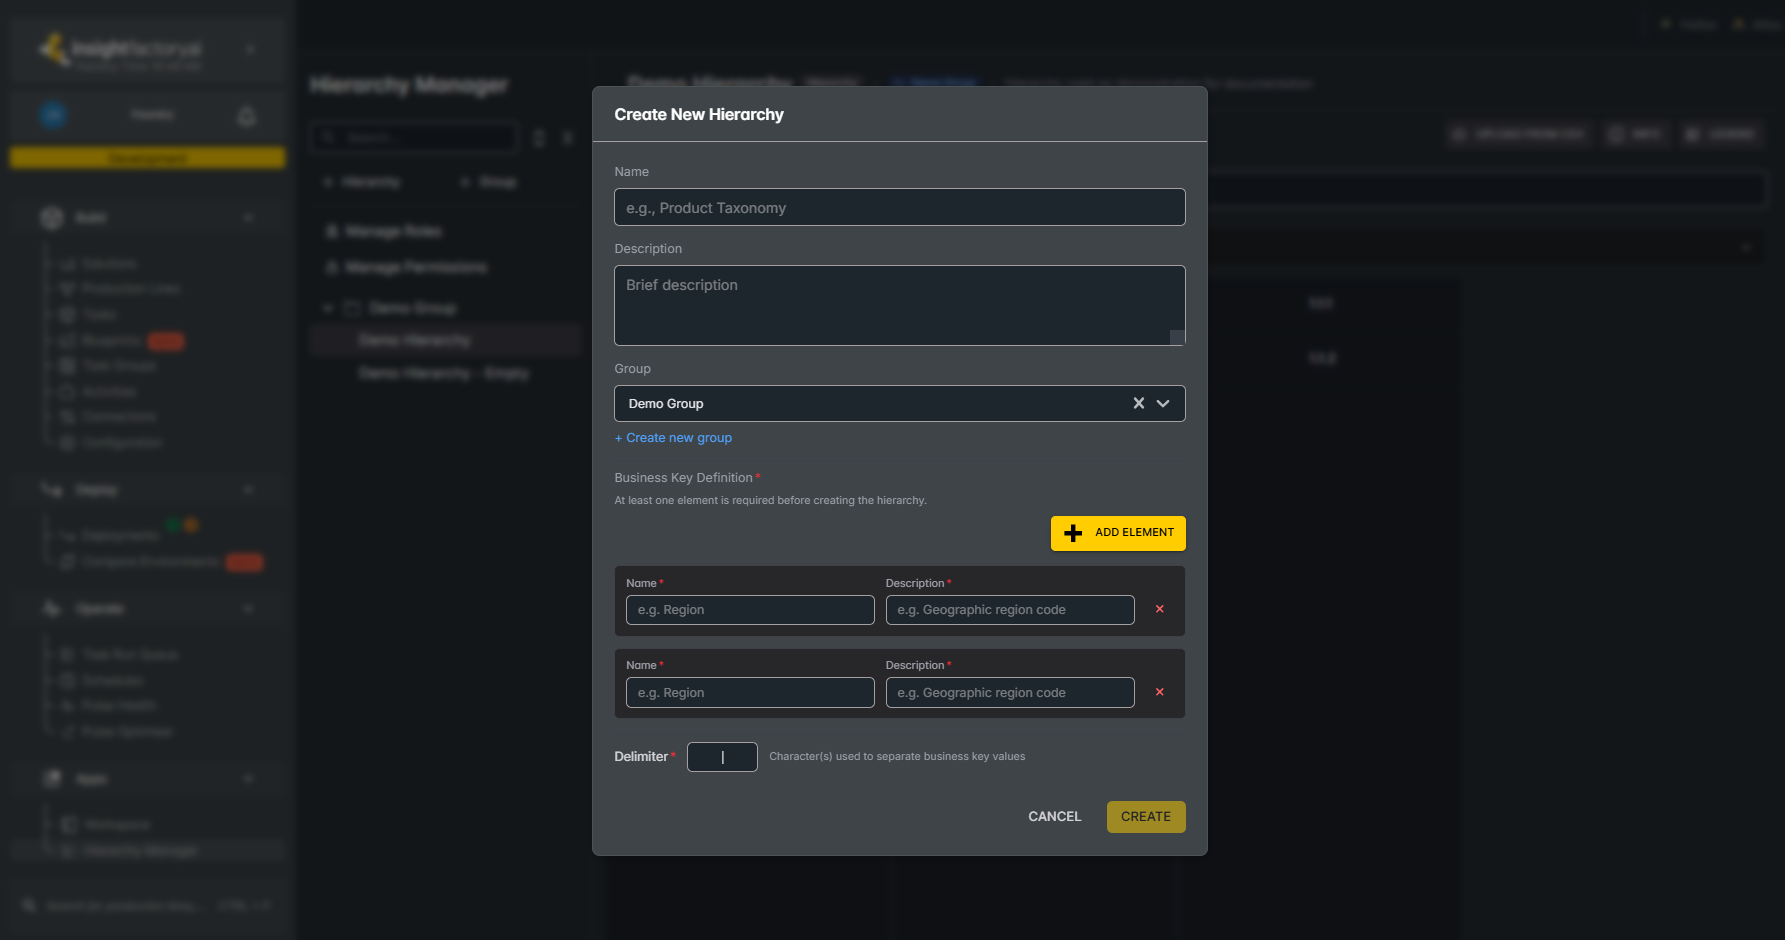
| Field | Description |
|---|---|
| Name | The unique identifier for your hierarchy (e.g., "Product Taxonomy") |
| Description | A brief description of the hierarchy's purpose |
| Group | Select an existing group or choose "+ Create new group" to add a new one |
| Business Key Definition | Define the elements that make up a node's business key in this hierarchy (see Business Key Definition) |
Business Key Definition
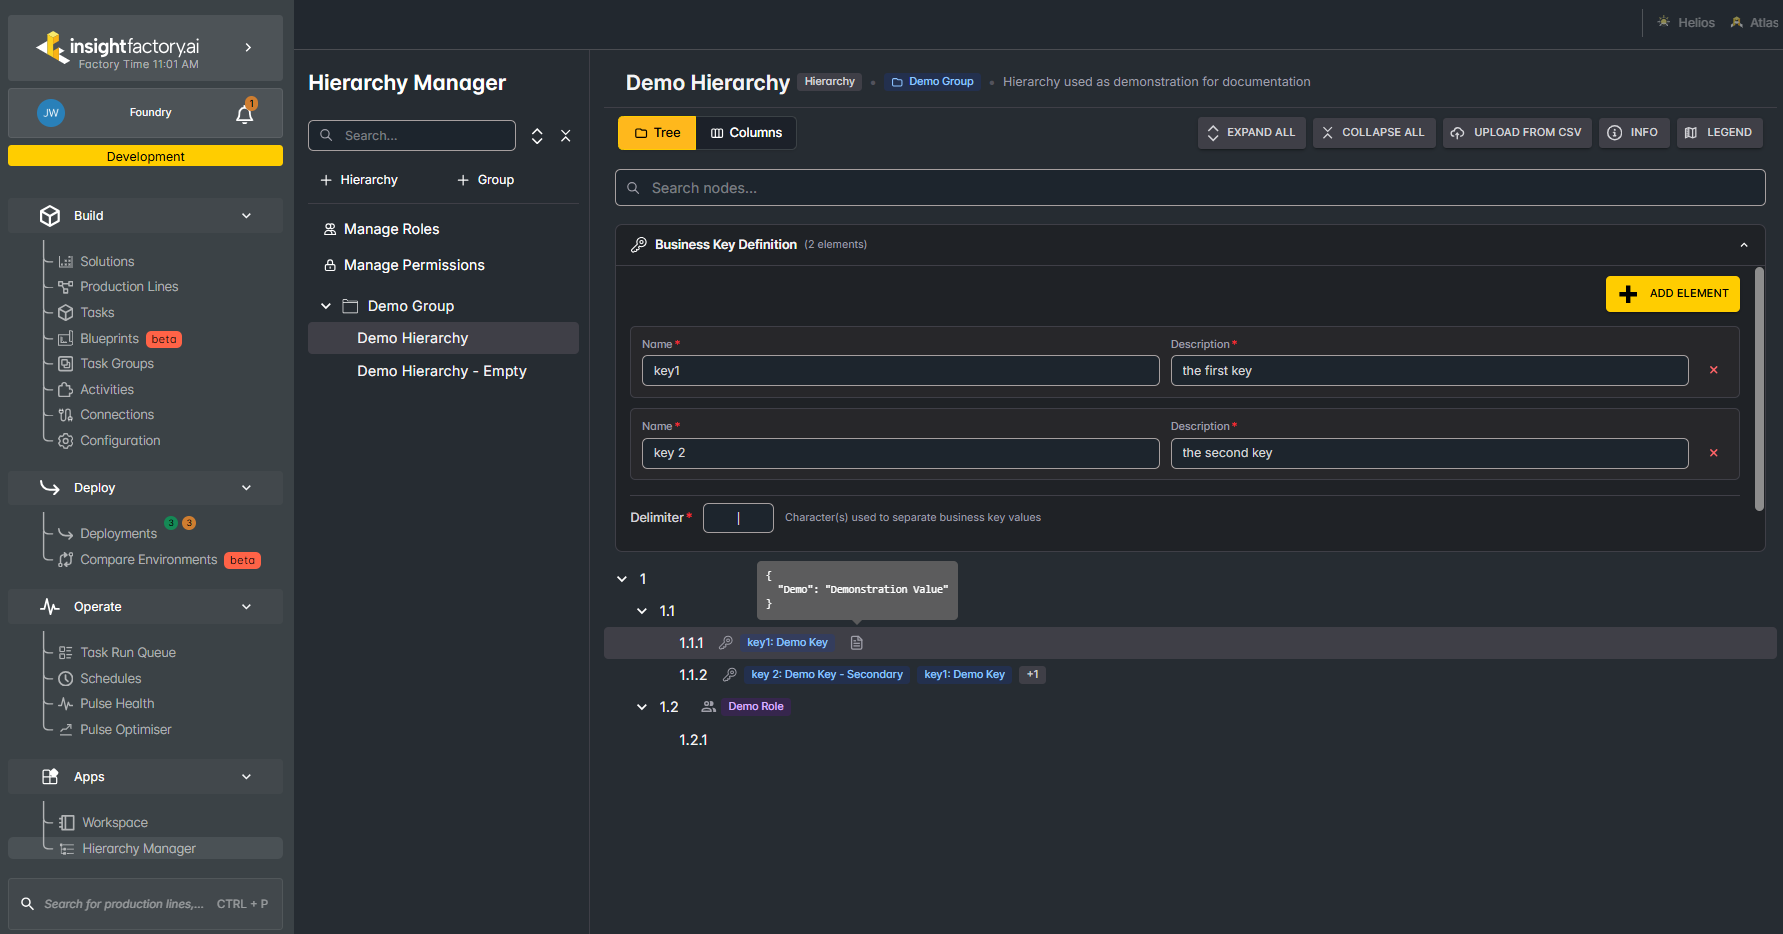
The business key definition sets the elements that business keys can use across the whole hierarchy. A business key may use any subset of these elements, but every element it uses must come from this definition.
Press Add Element to add an element to the definition. Each element has a name and a description, both of which are required. You cannot create a hierarchy without defining at least one element. In the dialog above, two elements have been added.
A business key is not mandatory for every node, but every business key must include at least one element from this definition.
The Delimiter field appears only when two or more elements are defined. When the NodeBusinessKeys table for this hierarchy is generated (outside the Hierarchy Manager), each node's business key is stored as a single string, and the delimiter is the character used to join its element values together. For example, with a delimiter of - and a business key of {"first name": "GC4", "last name": "last"}, the generated value is GC4-last.
Changing the Business Key Definition
Once a definition exists, you can change it from the expandable Business Key Definition panel shown in the Tree View example.
Saving a changed definition applies the new definition to every node in the hierarchy. Any business key element that is not in the new definition is permanently deleted, along with its values on every node. Renaming an element counts as deleting the old element and adding a new one, so the old element's values are lost as well.
This cannot be undone.
When you press Save and the change is destructive, such as renaming or deleting an element, a confirmation prompt appears before the change is applied. Only adding new elements is not destructive, so no confirmation appears in that case.
Creating a New Group
Click + Group in the sidebar to create a new group.
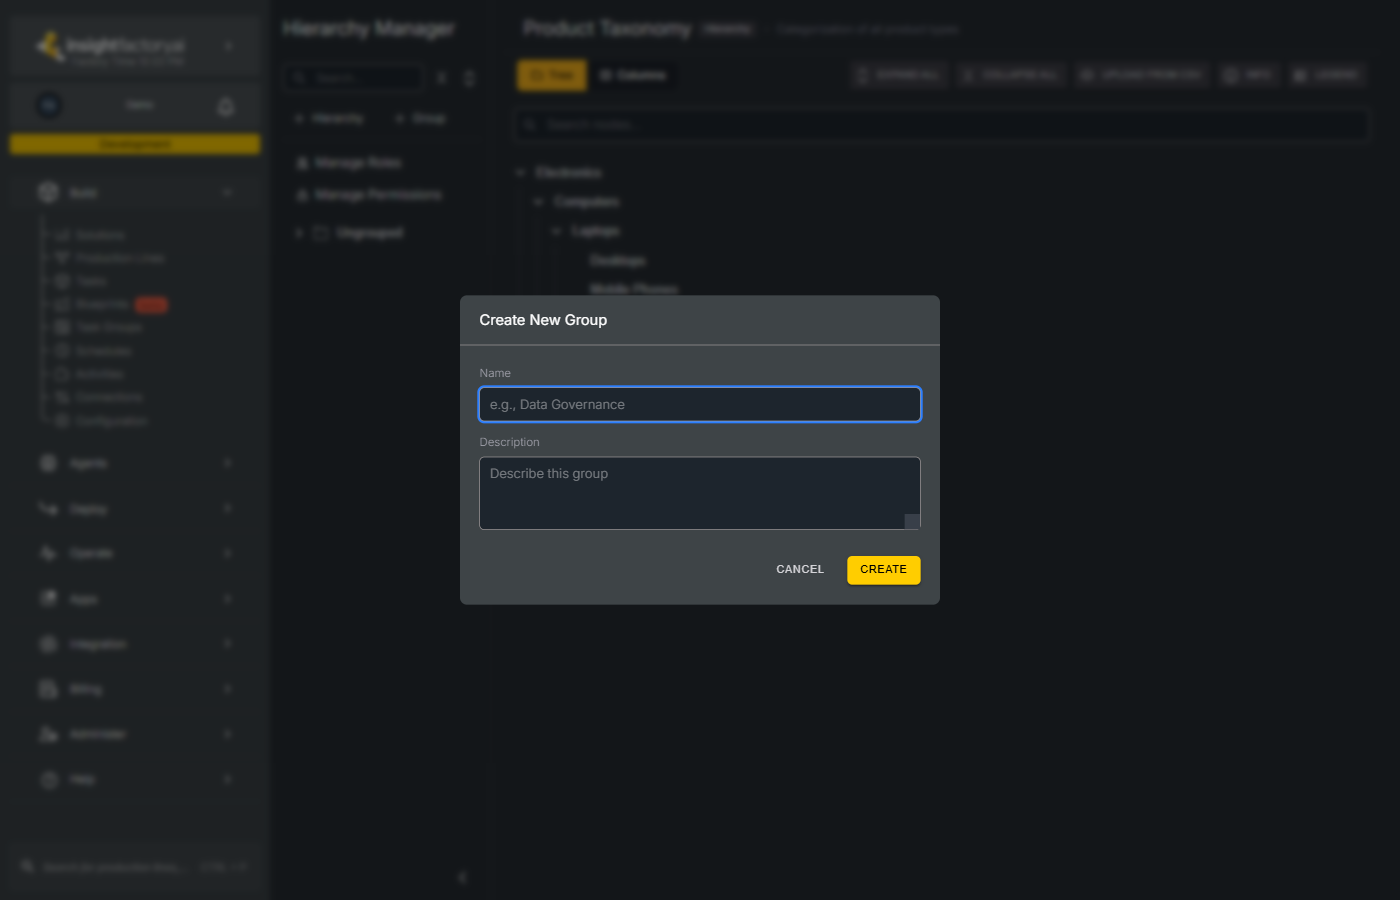
| Field | Description |
|---|---|
| Name | The group name (e.g., "Data Governance") |
| Description | Optional description of the group's purpose |
Viewing Hierarchies
Selecting a Hierarchy
Click on any hierarchy name in the sidebar to view its structure. The selected hierarchy is highlighted and its content appears in the main area.
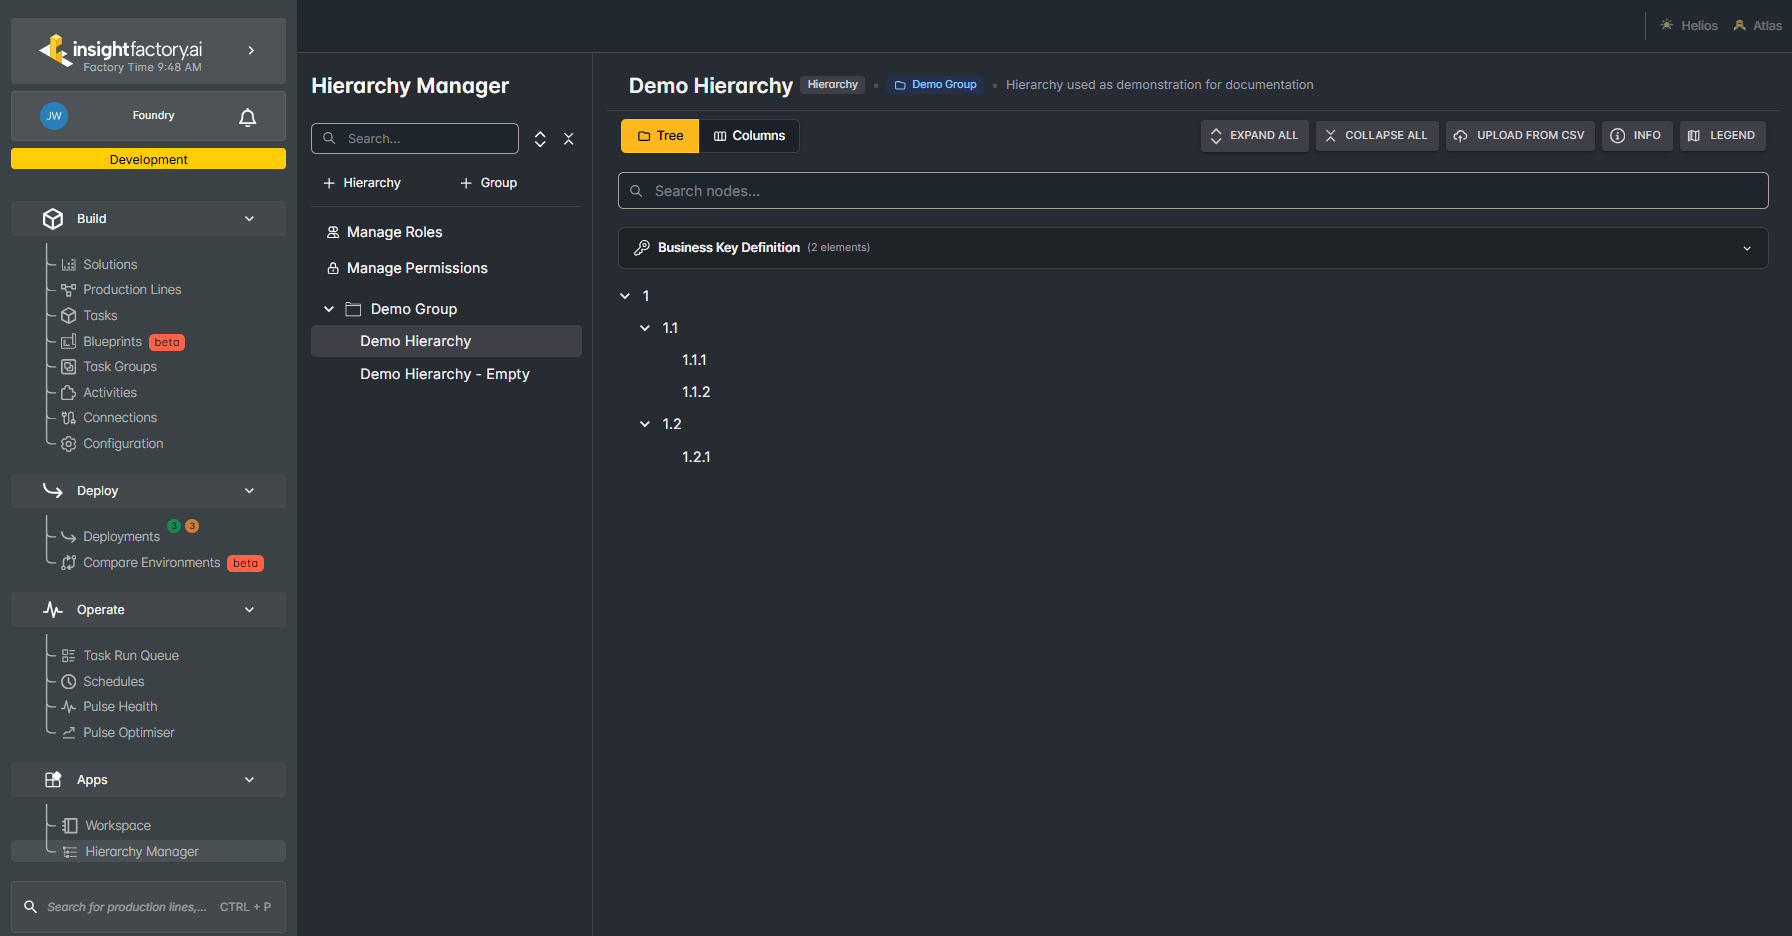
Tree View
The default view displays hierarchies as an expandable tree structure.
Tree View Features:
- Click the arrow to expand or collapse nodes.
- A node displays its name along with any assigned roles, business keys, and node attributes. Refer to the Legend for what each symbol means.
- Hover over the node attributes icon to view a node's attributes, and hover over the +<number> badge to view its additional business keys. The image above shows the attributes tooltip. See the Columns View example for the +<number> business key tooltip.
- The Business Key Definition panel at the top of the view is expandable. It is shown expanded above. See the Columns View example for the collapsed version.
- Double-click anywhere on a node other than its name to open the Edit Node dialog. See Editing Nodes.
- Indentation indicates parent-child relationships.
Columns View
Click the Columns button in the toolbar to switch to column-based navigation.
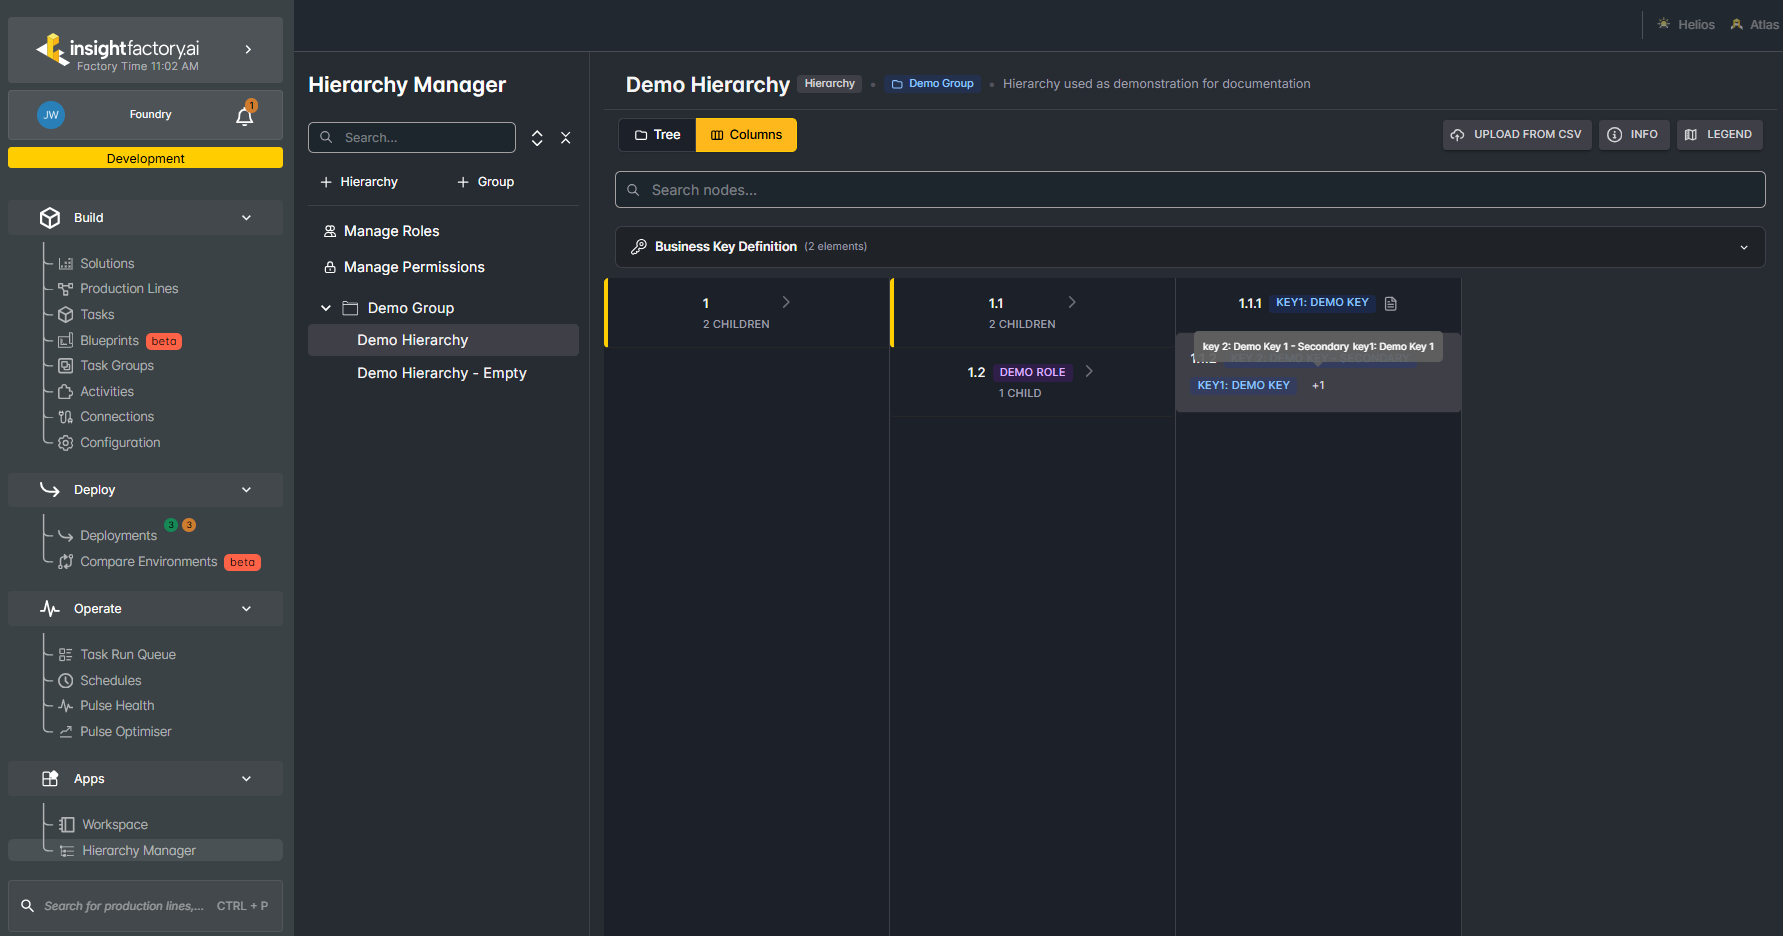
Columns View Features:
- Each column represents a level in the hierarchy.
- Shows the child count for each node.
- Click a node to reveal its children in the next column.
- A node displays its name along with any assigned roles, business keys, and node attributes. Refer to the Legend for what each symbol means.
- Hover over the node attributes icon to view a node's attributes, and hover over the +<number> badge to view its additional business keys. The image above shows the +<number> business key tooltip. See the Tree View example for the node attributes tooltip.
- The Business Key Definition panel at the top of the view is expandable. It is shown collapsed above. See the Tree View example for the expanded version.
- Works well for wide, shallow hierarchies.
Managing Nodes
Context Menu
Right-click on any node to access the context menu with available actions.
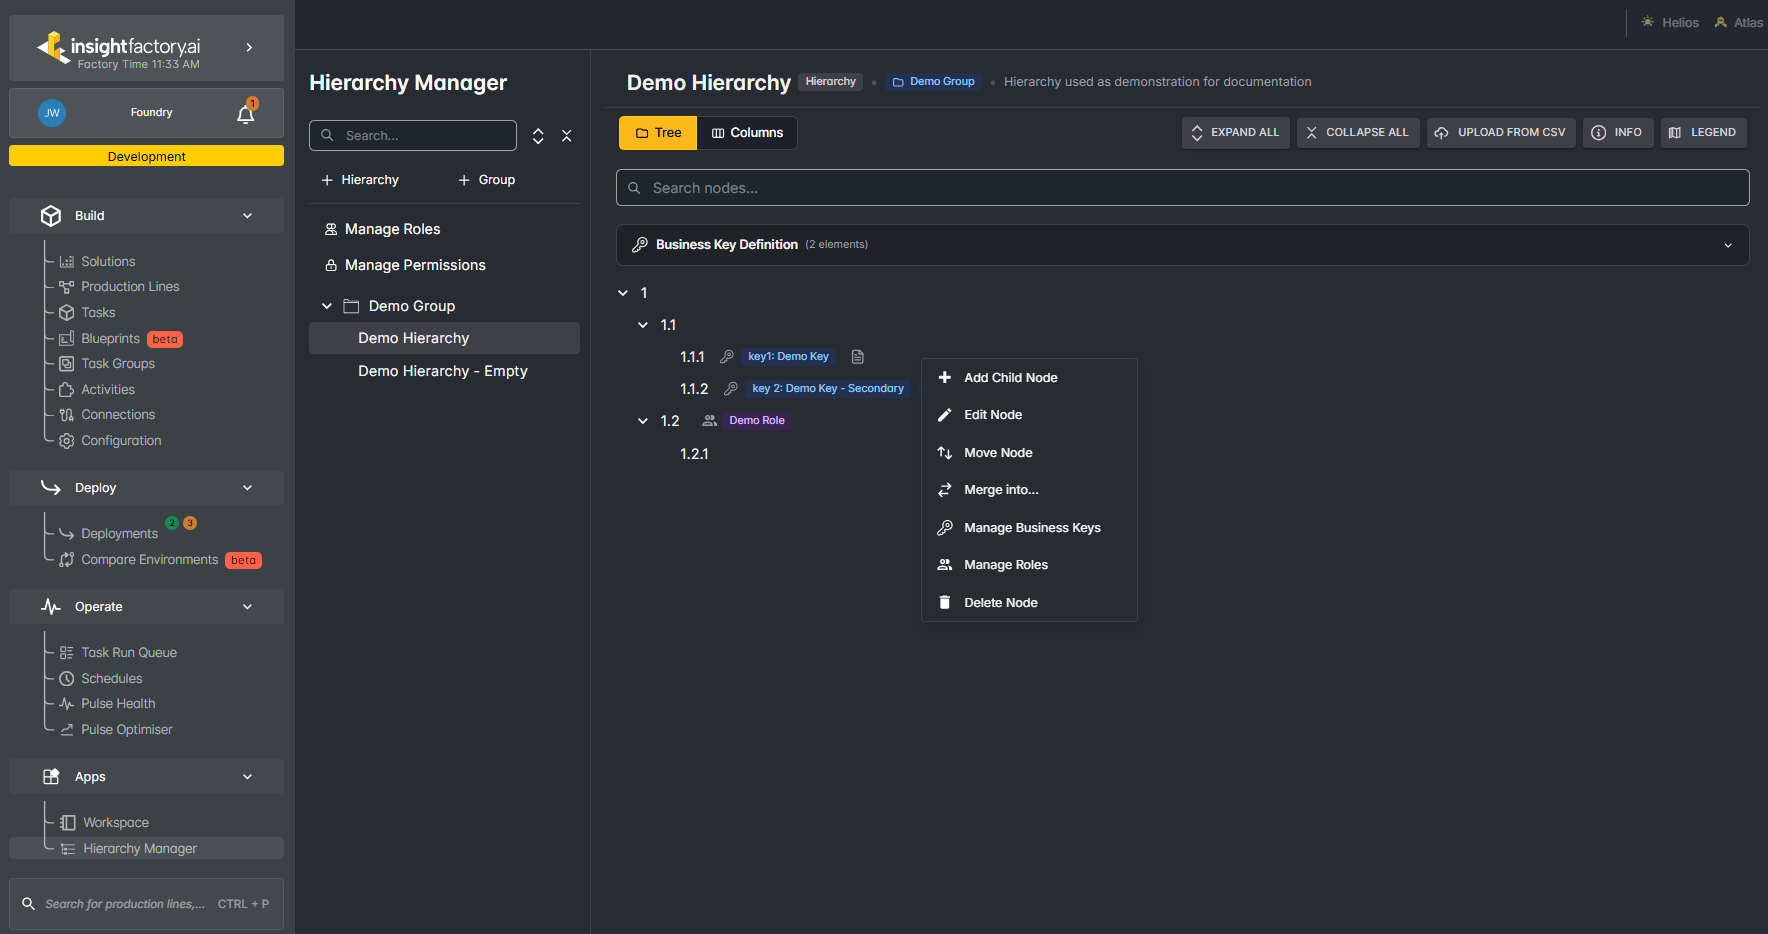
| Action | Description |
|---|---|
| Add Child Node | Create a new child node under the selected node |
| Edit Node | Open the node editor to modify properties |
| Move Node | Relocate the node to a different parent |
| Merge into... | Merge this node into another node |
| Manage Business Keys | Add or edit business keys for this node |
| Manage Roles | Assign or remove roles from this node |
| Delete Node | Remove the node (highlighted in red) |
Editing Nodes
Select Edit Node from the context menu to open the editor. You can also double-click anywhere on a node (other than its name) to open the Edit Node dialog.
The dialog shown is for creating a new node. The fields are identical when editing an existing node, except they are pre-filled with that node's values.
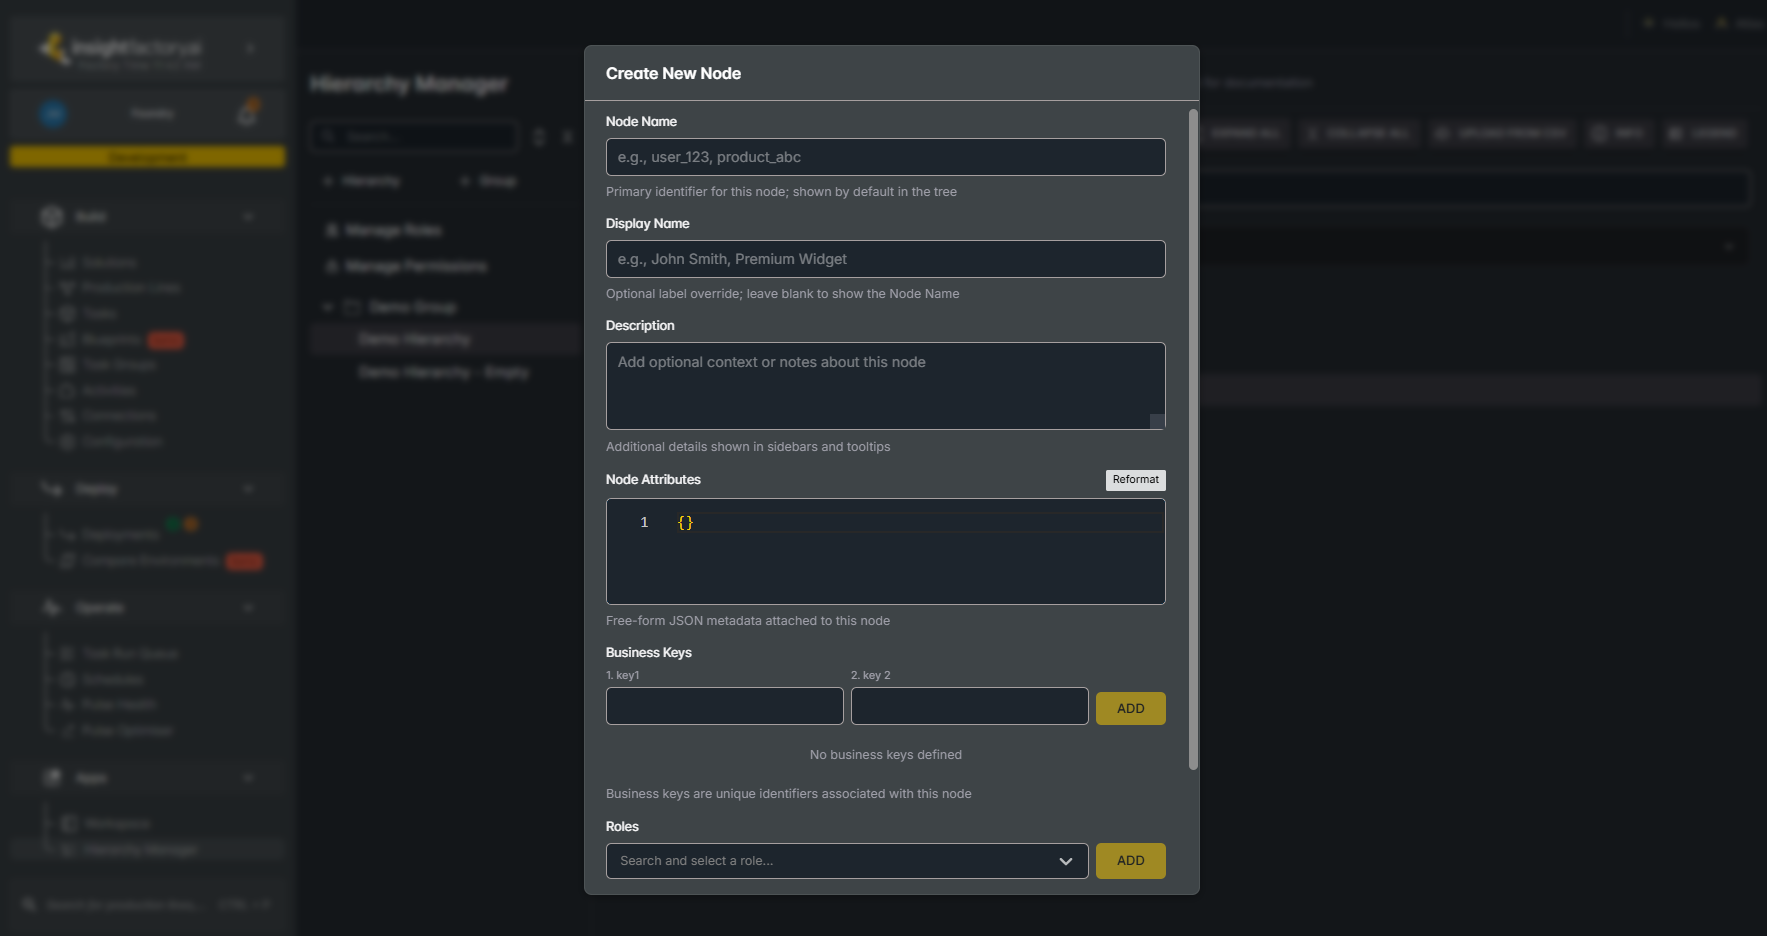
| Property | Description |
|---|---|
| Node Name | Primary identifier shown in the tree (required) |
| Display Name | Optional override label for display purposes |
| Description | Additional context or notes about the node |
| Node Attributes | Free-form JSON metadata attached to this node |
| Business Keys | Identifiers associated with this node that follow the hierarchy's business key definition. They do not have to be unique. |
| Roles | Roles assigned to this node |
Double-click a node's name to edit the name in place.
Node Attributes
Node attributes are a free-form JSON object whose content is entirely up to you. The only restriction is that it must be valid JSON. Use it for information that doesn't belong in the business key definition and likely applies only to this node, for example {"contributors": ["John", "Mary"]}.
Adding Business Keys
The Business Keys section shows one input field per element in the hierarchy's business key definition — the same definition shown in the Tree View example.
- Enter a value in at least one of the input fields
- Click ADD to add the key
- Business keys appear as tags on the node in the tree view with a key icon.
Assigning Roles
- Click the role dropdown to search and select a role
- Click ADD to assign the role
- Roles are displayed with a purple icon next to the node name
Managing Roles
Click Manage Roles in the sidebar to access the roles management page.
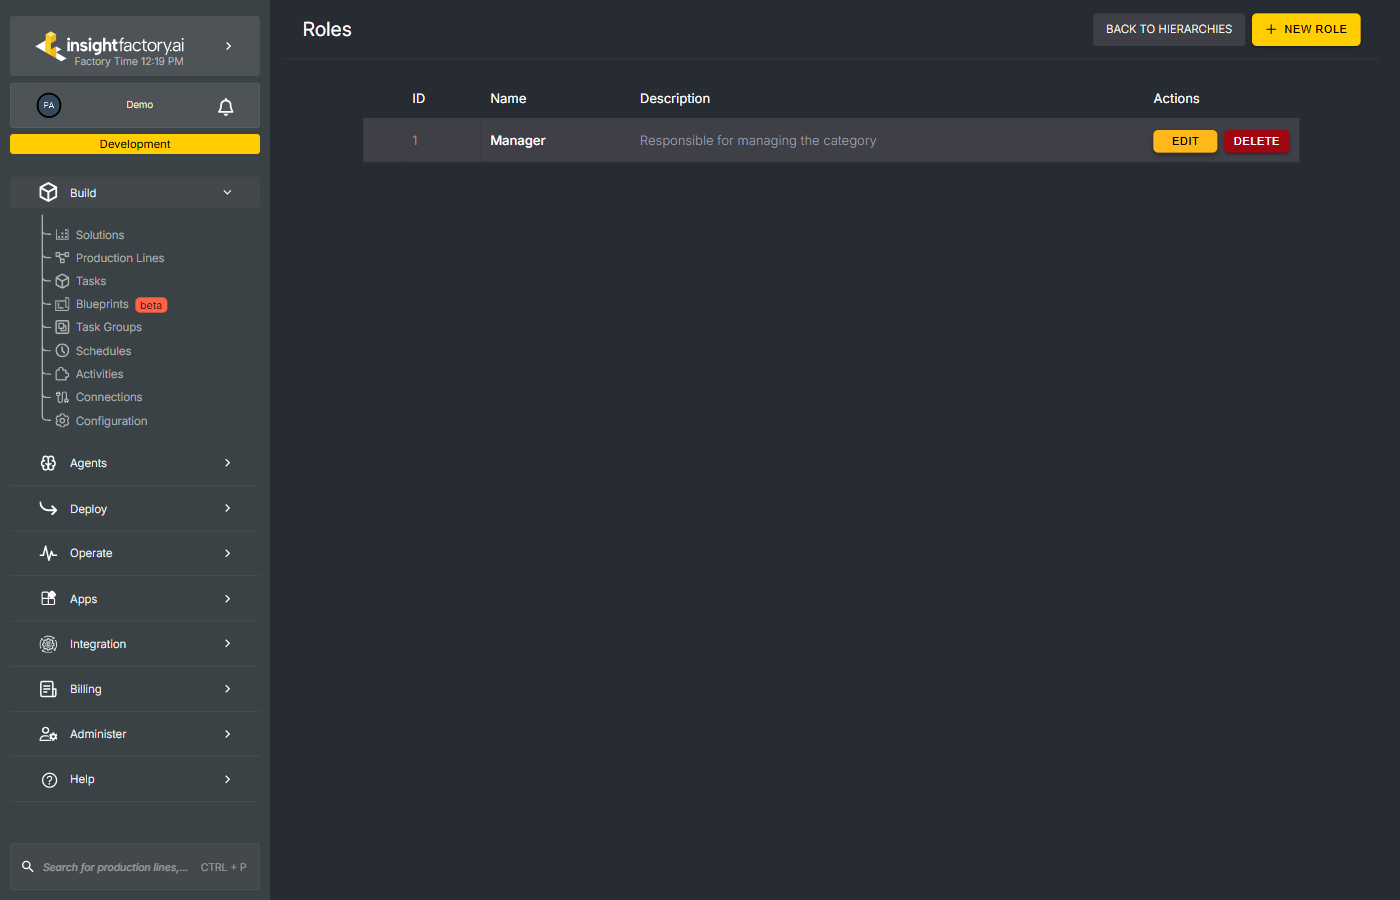
Roles Table
| Column | Description |
|---|---|
| ID | Auto-generated unique identifier |
| Name | The role name |
| Description | Purpose or description of the role |
| Actions | Edit or Delete the role |
Creating a New Role
Click + NEW ROLE to add a new role inline.
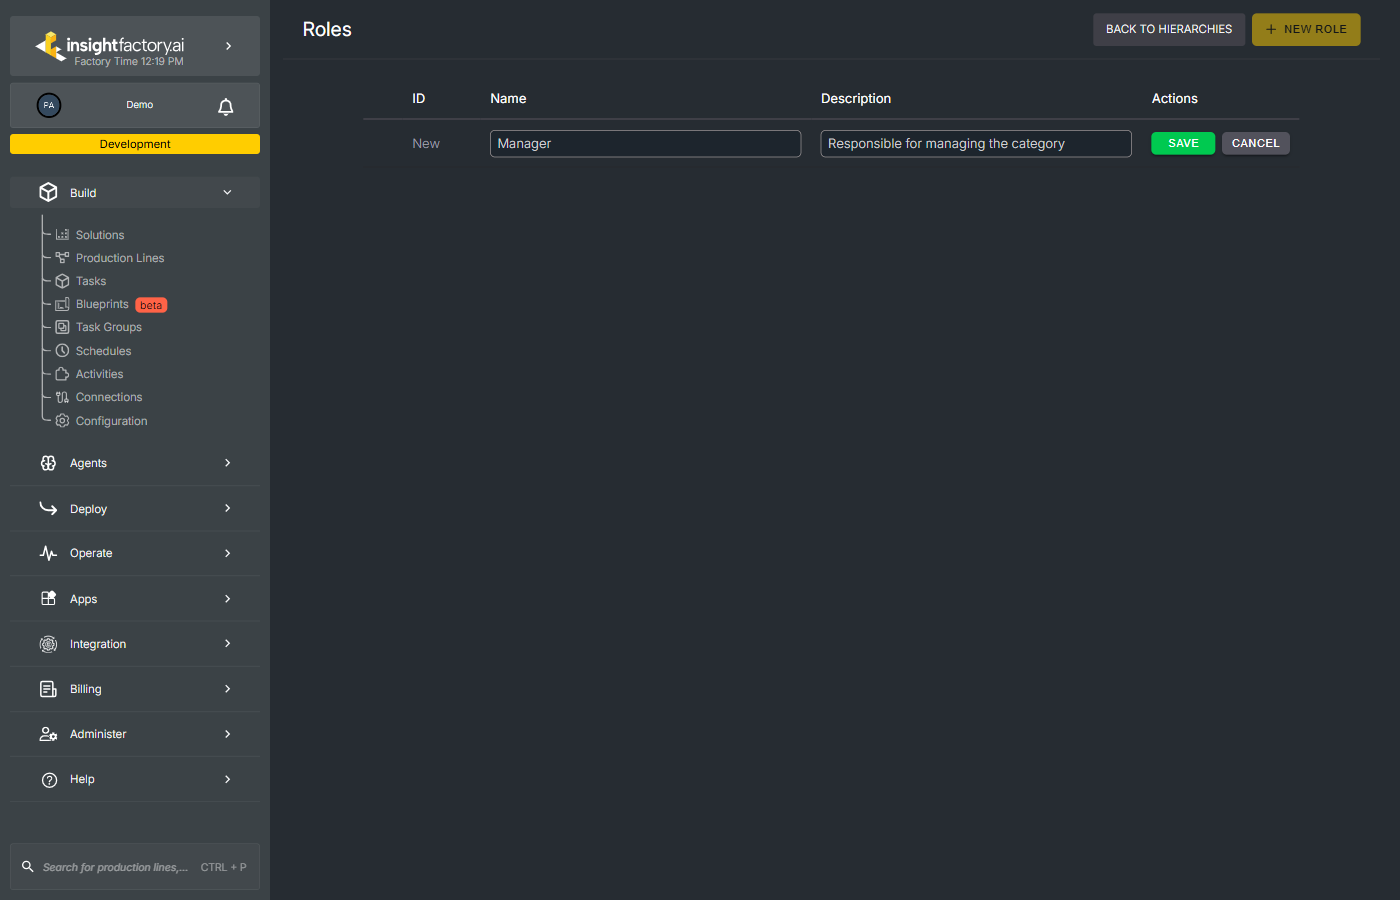
Enter the role name and description, then click SAVE to create the role.
Managing Permissions
Click Manage Permissions in the sidebar to access the permissions page.
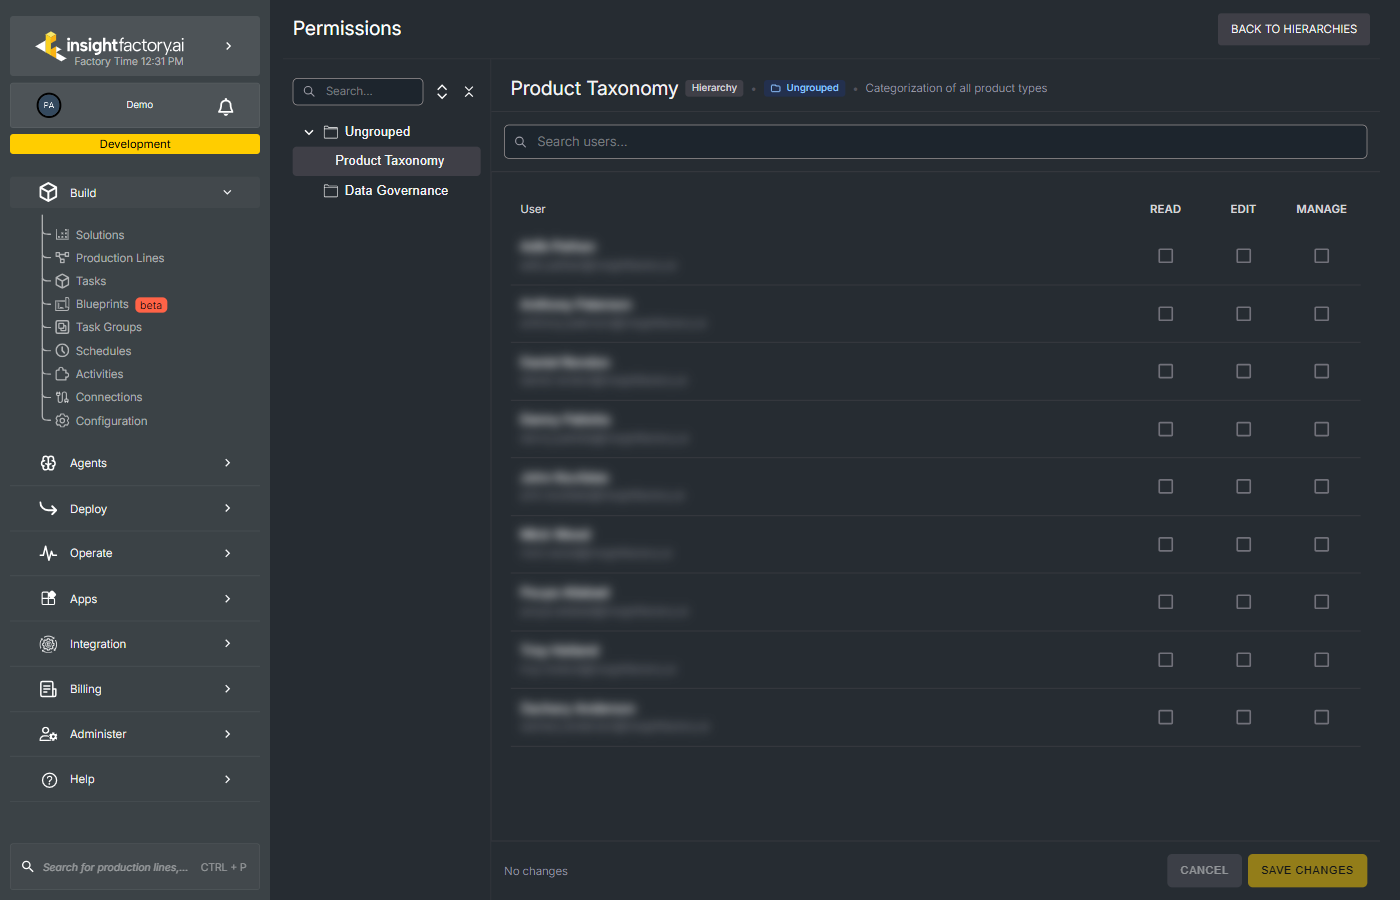
Permission Levels
| Permission | Description |
|---|---|
| READ | View the hierarchy and its nodes |
| EDIT | Modify nodes within the hierarchy |
| MANAGE | Full control including permissions management |
Setting Permissions
- Select a group or hierarchy from the left panel
- Users with access appear in the main area
- Check/uncheck permission boxes as needed
- Click SAVE CHANGES to apply
Toolbar Actions
The toolbar at the top of the main content area provides quick actions.
View Controls
- Tree — Switch to Tree View
- Columns — Switch to Columns View
Tree Actions
- Expand All — Expand the currently deepest open nodes by one more level. This does not fully expand every node down to the leaf nodes.
- Collapse All — Collapse all nodes to show only the root node.
Utilities
- Upload from CSV — Import hierarchy data from a CSV file. See CSV Format for how the file should be structured, including an example file.
- Info — View hierarchy information and metadata. Includes a link to this documentation page.
- Legend — Display the legend for icons and indicators. Includes a link to this documentation page.
Searching
Sidebar Search
Use the search bar at the top of the sidebar to filter hierarchies by name.
Node Search
Use the "Search nodes..." field above the tree to find nodes within the current hierarchy. The search covers a node's name, display name, business key values, and node attribute values.
Matching works differently per field:
- Node name, display name, and node attribute values — substring match. If a node's attribute value is
Demonstration Value, searchingDemonstration Valmatches it. - Business key values — exact string match. If a node's business key value is
Demo Key, searchingDemo Keymatches it, but searchingDemodoes not.
The search matches on values only, not on field names. For a business key key1: Demo Key, searching key1 returns nothing. For an attribute {"region": "North"}, searching region returns nothing — only the value North matches.
How results are shown depends on the active view:
-
Tree View — the tree expands to the shallowest matching node on each path. You can keep expanding from there to navigate further down the tree. In the example below, searching
Demonstration Valmatches node1.1.1on its attribute value (a substring match).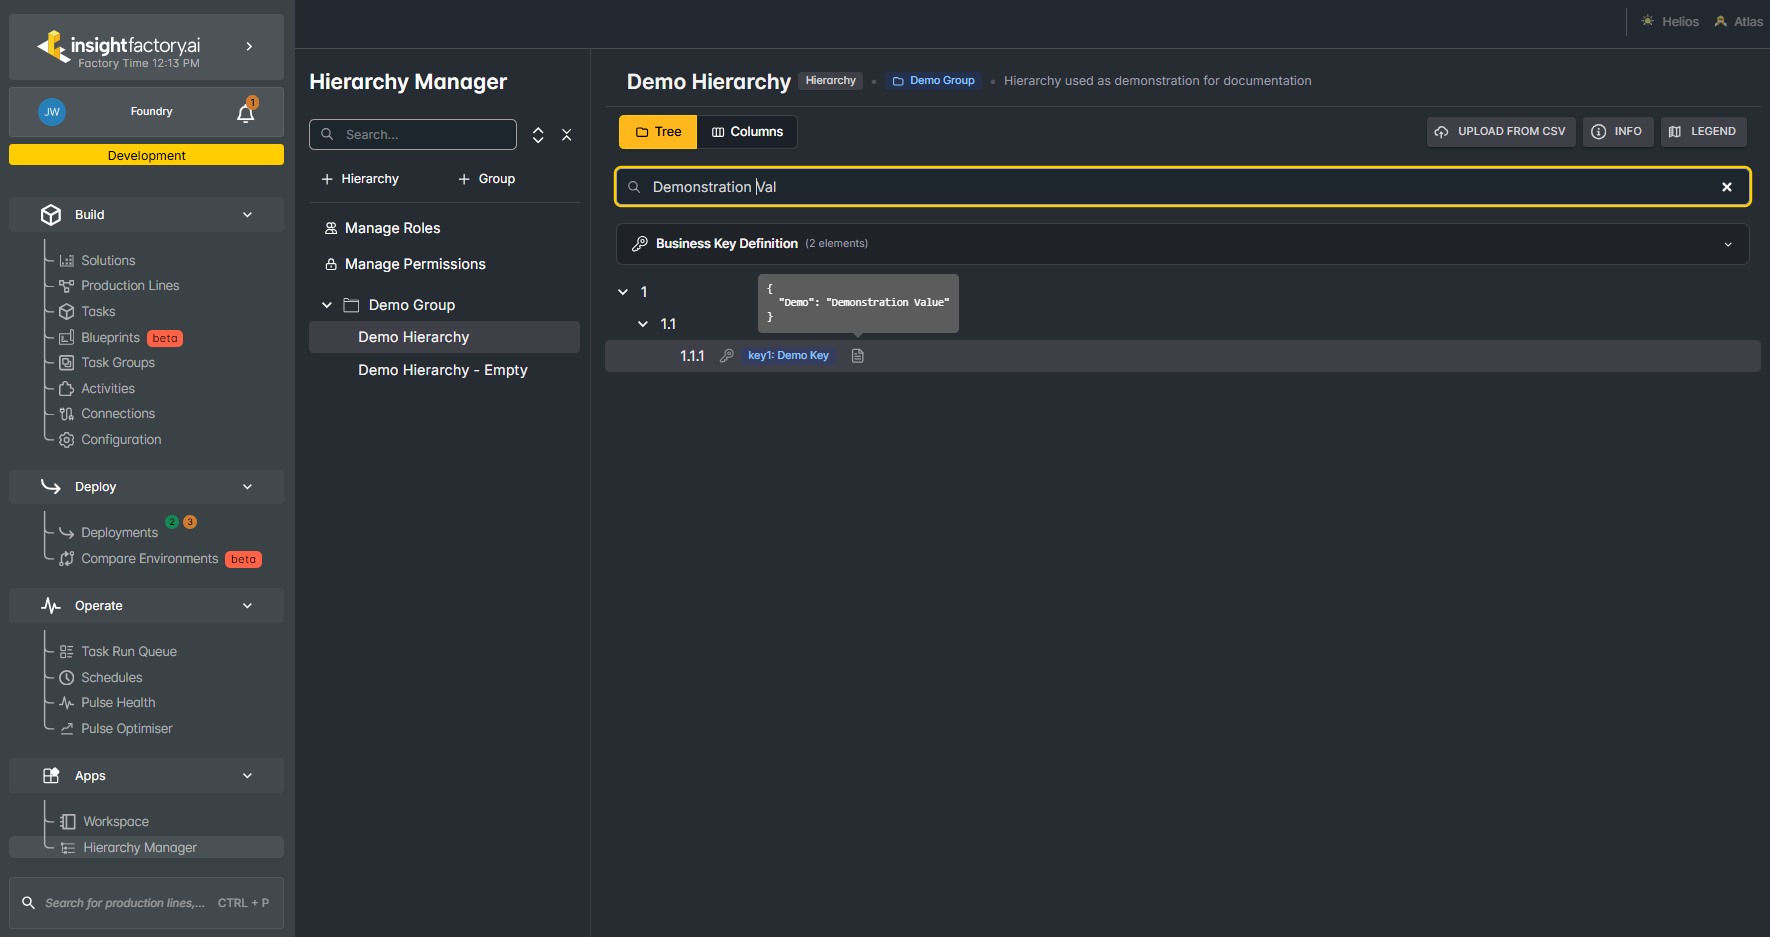
-
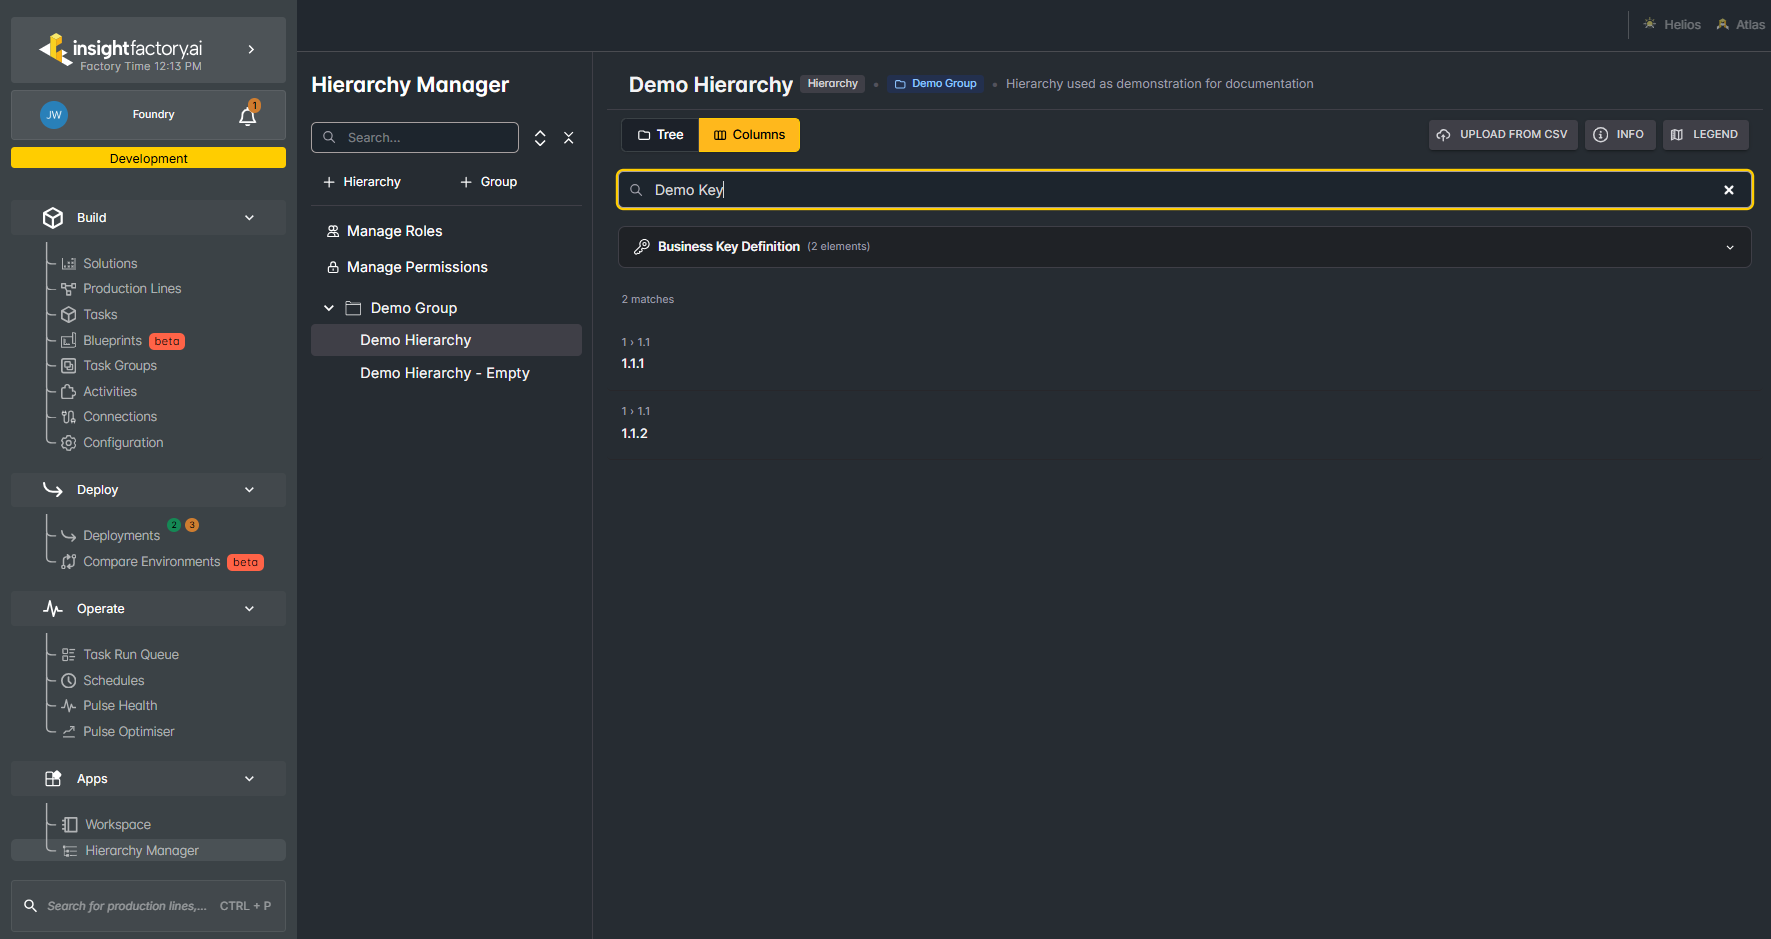
Columns View — matching nodes are listed, each shown as the shallowest matching node with the ancestry path leading to it. Click an item to navigate to it. In the example below, searching
Demo Keyreturns the nodes whose business key value is exactlyDemo Key(an exact match).